Manage Time Offs is the one place where you oversee every time-off record in your branch. Employee vacation and leave transactions, balance adjustments, and moved balances all live on the same page, each on its own tab, so you no longer have to move between separate screens.
From here you can add transactions on behalf of employees, import them in bulk from a spreadsheet, adjust balances up or down, generate disciplinary actions, review the full approval cycle of any record, and export or print any view you build.
This guide walks through the page tab by tab: what each table shows, how to filter it, and every action available to you.
Getting to Manage Time Offs
Main Menu → Time Management → Leaves & Vacations → Manage Time Offs
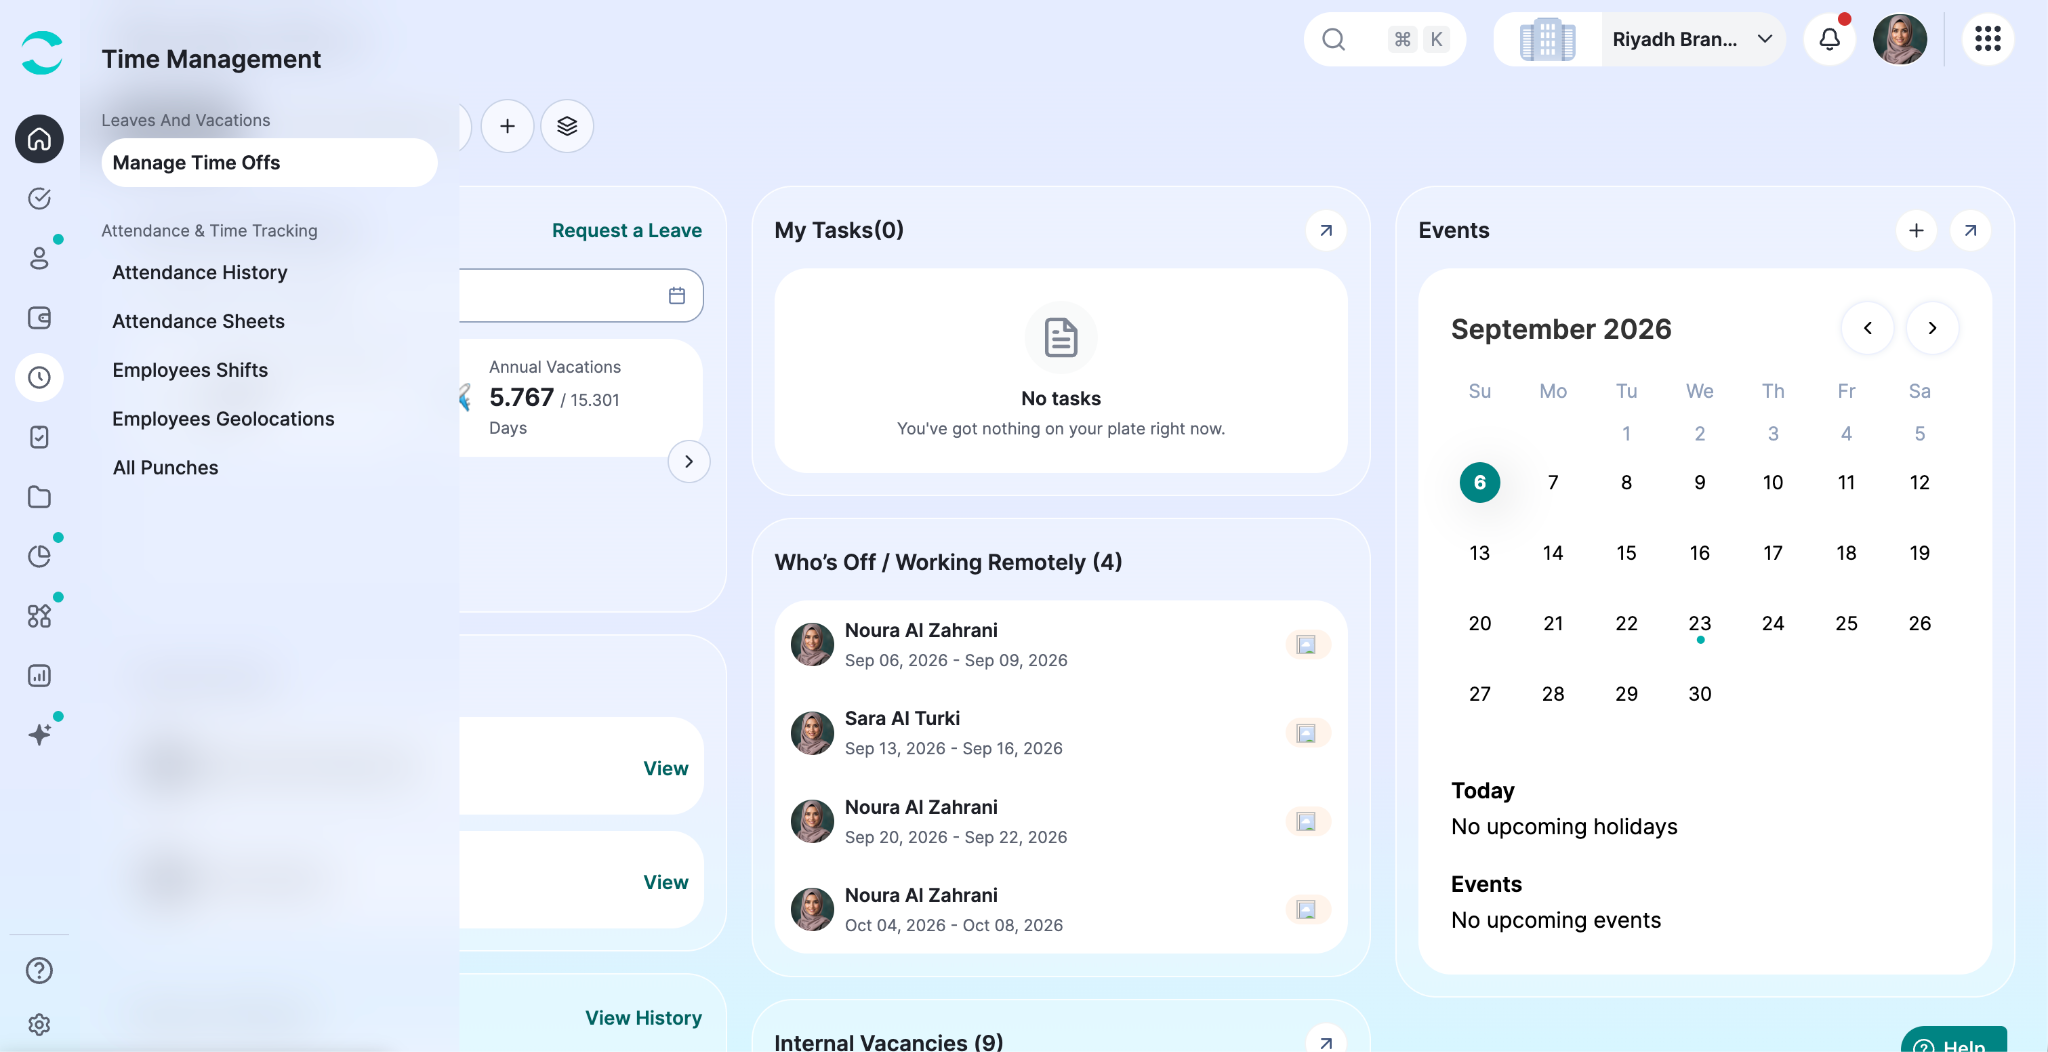
The Manage Adjustments and Manage Moved Balances menu items open the same page, already on their own tab.
How the Page Is Organized
The page has three areas:
Timeoff Types panel (left). Your tabs. Click a type to switch the table. Use the panel icon in its header to collapse it and give the table the full width; a toggle then appears on the table toolbar to bring it back.
Page actions (top right). The buttons for the selected tab - a primary action such as Add Transaction, and a More Actions menu. These change with the tab and with your permissions.
Table (center). The records for the selected tab, with search, filters, columns and export.
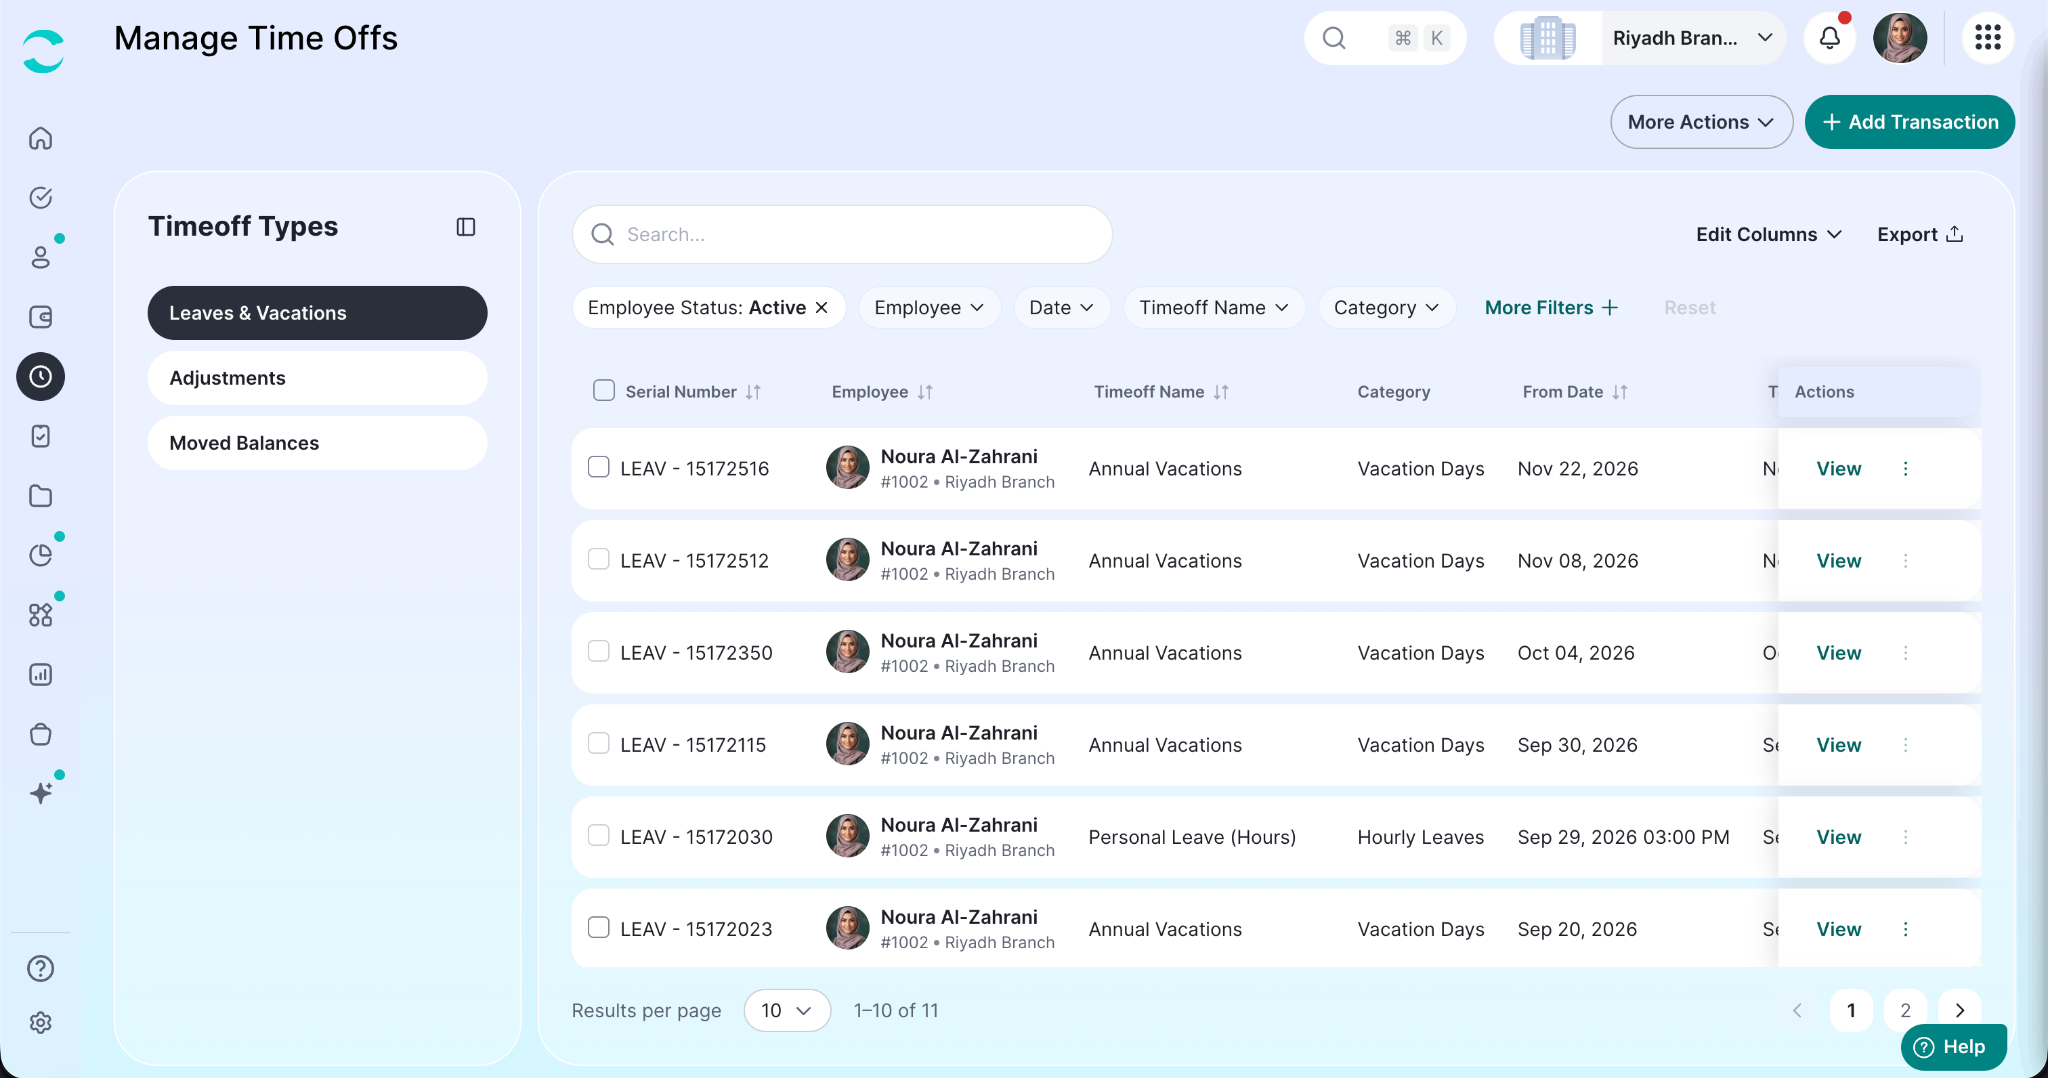
The tab you are on is kept in the page address, so you can bookmark or share a link to a specific tab - along with the filters you applied to it.
The Tabs
Good to know: A tab only appears if you have access to it, and the actions inside a tab only appear if you have write access on it. With read-only access you still get the table, its filters, the details view and export - but no add, edit or delete.
Working With Any Table
These work the same way on every tab.
Searching
Use the search box to find records by employee name or employment number. Results narrow as you type.
Filtering
Filter chips sit above the table. Click a chip, choose a value, and the table reloads. Chips that don't fit on the toolbar are grouped under More Filters.
Every tab starts filtered to Employee Status: Active - clear or change that chip to include inactive employees.
Your filters are kept in the page address, so a filtered view survives a refresh and can be shared as a link.

Columns
Edit Columns - choose which columns to show or hide. The Employment Number starts hidden on every tab; turn it on here when you need it.
Drag a column header to reorder the columns.
Pin a column to keep it visible while you scroll sideways.
Click a sortable column header to sort by it; click again to reverse, and once more to clear.
The Actions column and the first identifying column stay in place and can't be hidden.
Paging
Choose how many records appear per page and move between pages from the bottom of the table.
Opening a record
Click anywhere on a row - or choose View in its Actions column - to open the details panel on the right.
Exporting and printing
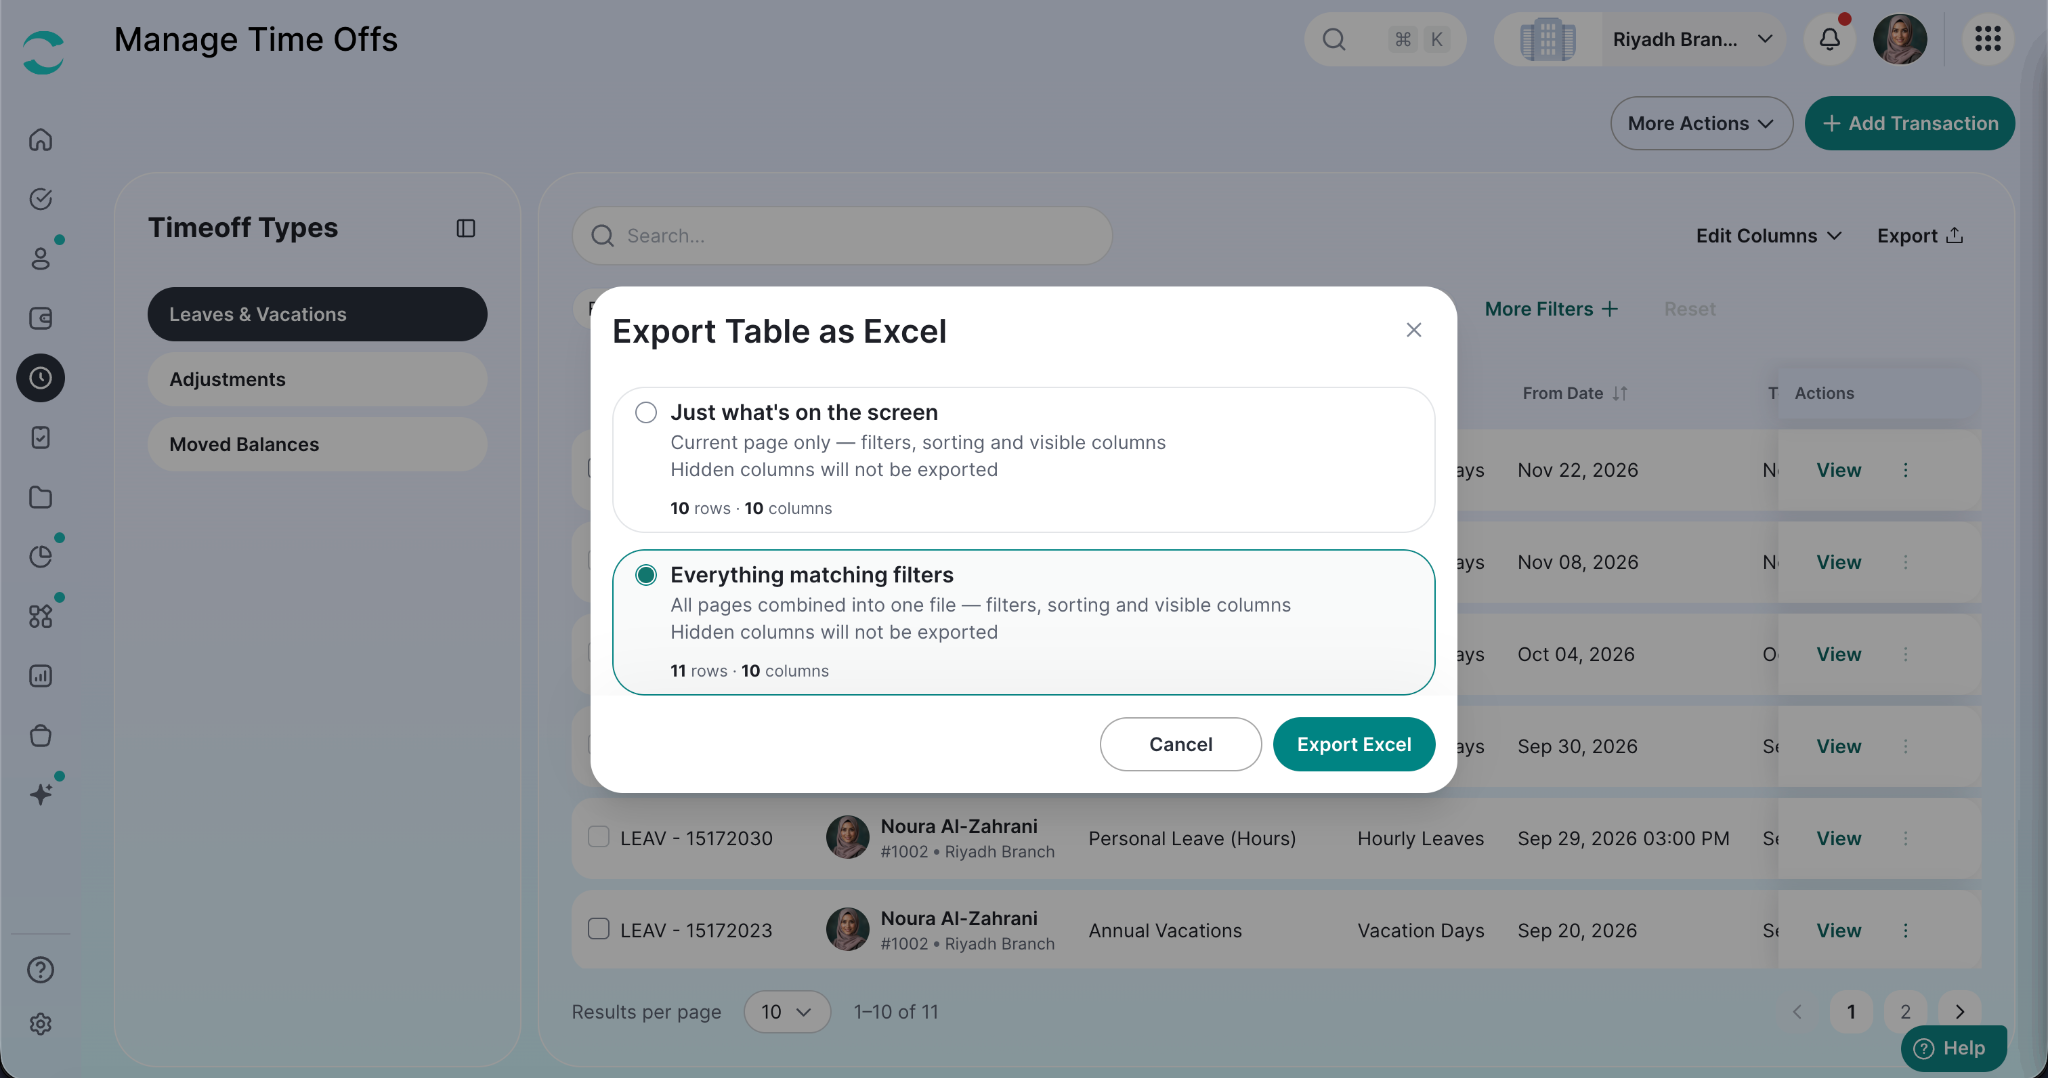
Use Export on the table toolbar and pick a format:
Export as Excel
Export as CSV
Export as PDF
Print
ZenHR then asks how much to include:
Just what's on the screen - the current page only.
Everything matching filters - every page that matches your current search and filters, combined into one file.
Either way the file keeps your filters, your sorting and your visible columns. Hidden columns are not exported.
Tab 1 - Leaves & Vacations
This is the default tab. It lists every vacation and leave transaction for the employees you have access to, whether the employee requested it or HR added it.
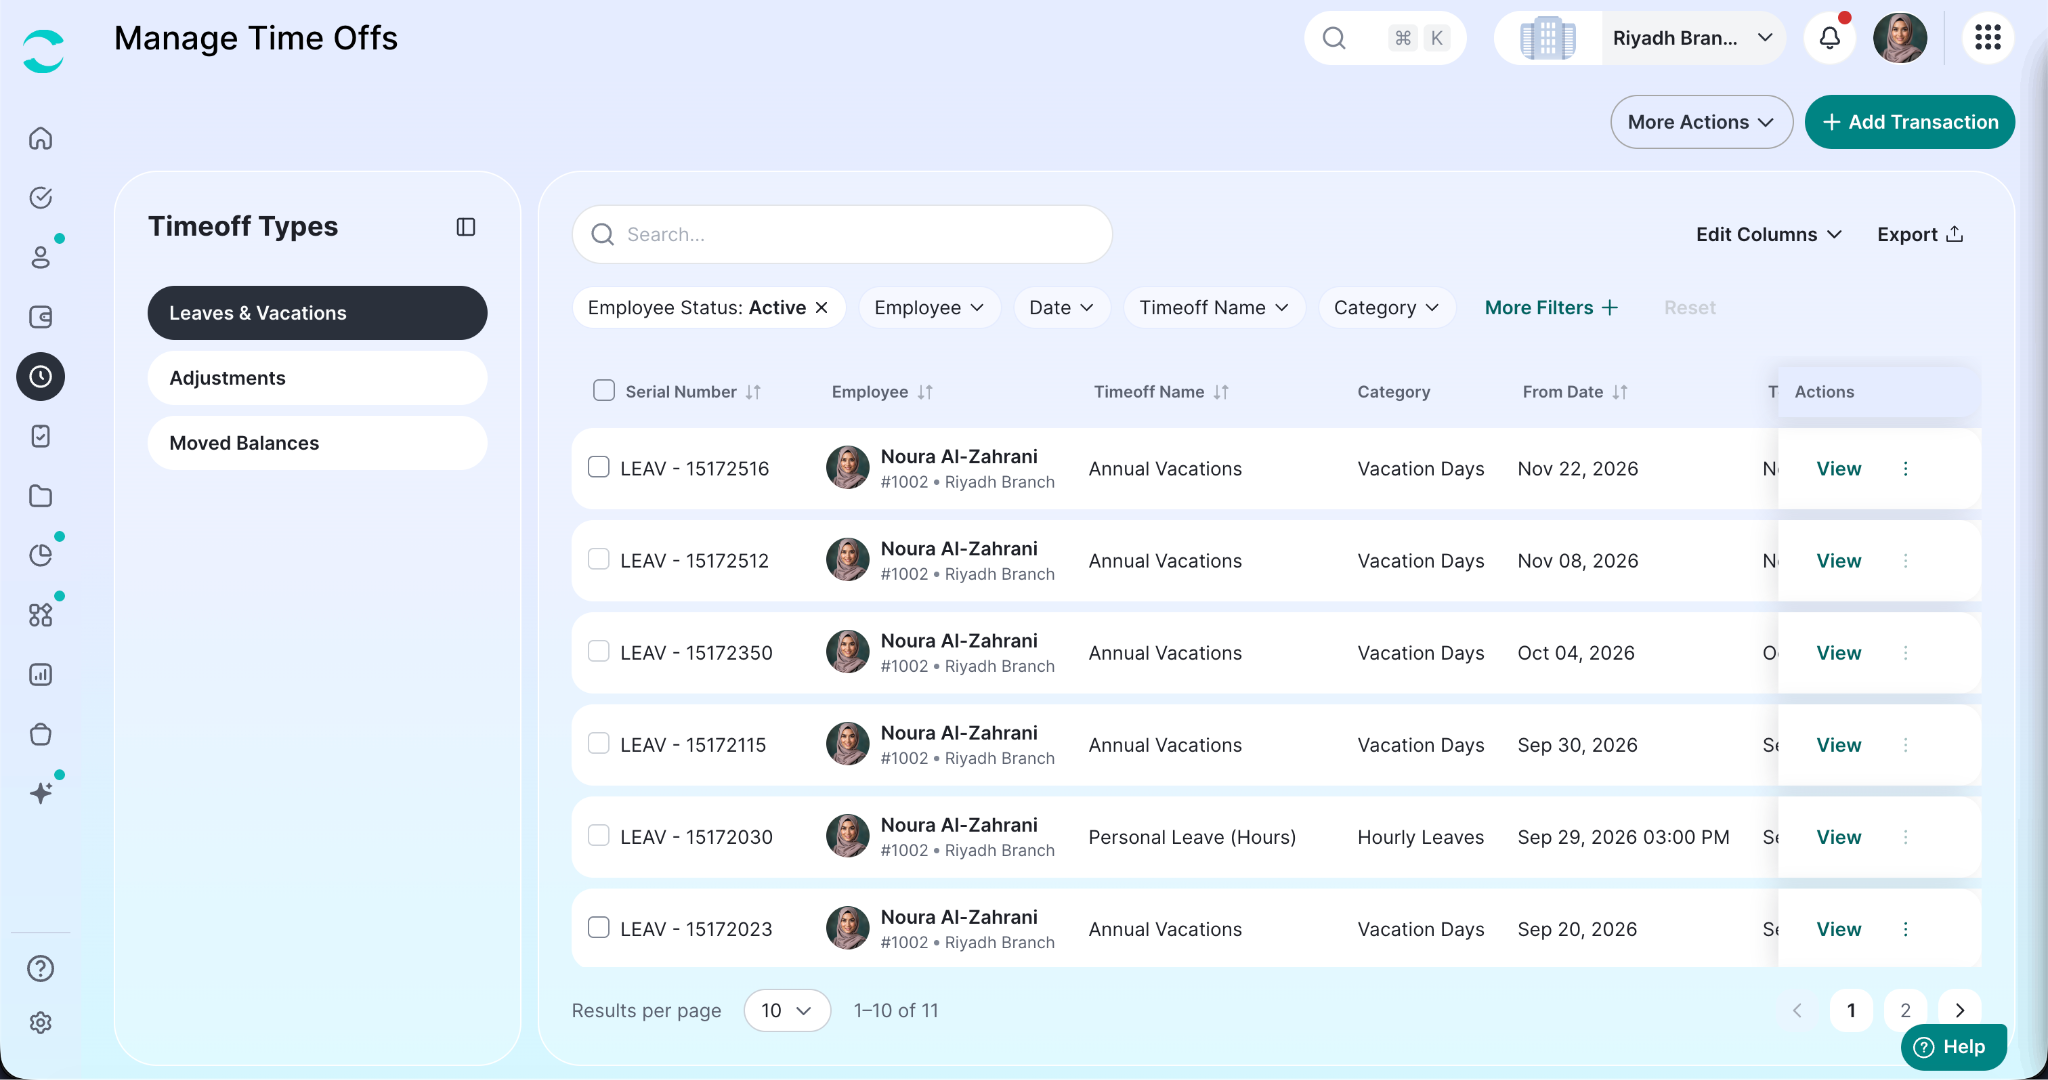
What the Table Shows
Filters
Date - one range: its start bounds the record's From Date, its end bounds the record's To Date
Timeoff Name
Category - Vacation Days or Hourly Leaves
Work location, Department, Section, Main project, Hierarchy group
Status - Pending, Approved, Rejected, Added by HR, Cancelled, Cancel Requested
Employee Status - Active or Inactive (starts on Active)
Requester - Yes for records the employee requested, No for records added on their behalf
Adding a Transaction
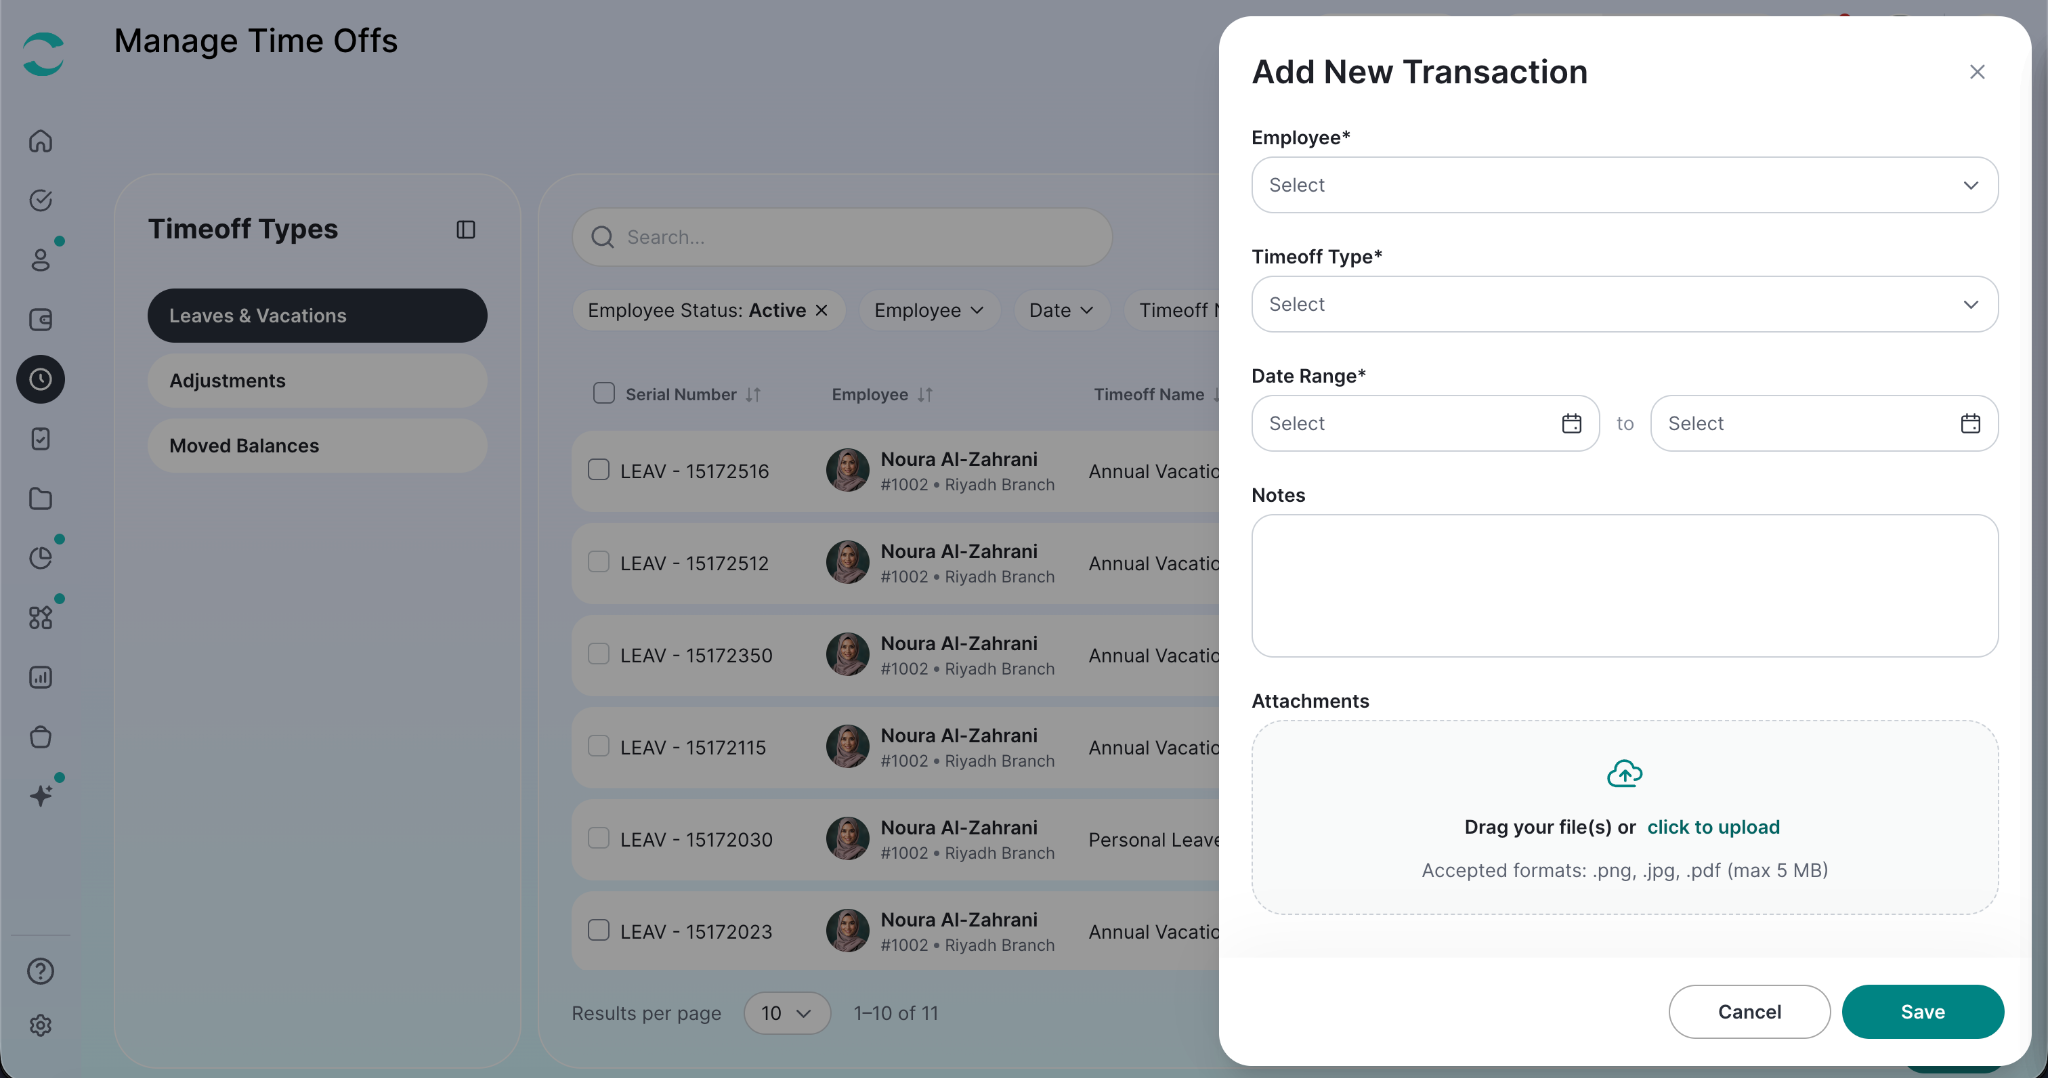
Click "+ Add Transaction".
Choose the Employee.
Choose the Timeoff Type.
Set the period:
For a vacation type, set the Date Range.
For a leave type, set the Time Range - the same range, with a time on each end.
Review the Amount. ZenHR calculates it for you as soon as the employee, type and dates are all filled in - days for a vacation, hours and minutes for a leave.
Review the Deduction Setup breakdown if one appears. It shows how the amount is split across your deduction brackets and the percentage deducted from each.
Add Notes if needed.
Add Attachments if needed. Accepted files: .png, .jpg, .jpeg, .pdf, .doc, .docx, .txt, .rtf
Click "Save".
Good to know: some time off types are set to start on the employee's first request. If this is the employee's first, ZenHR asks you to confirm before it moves the balance start date. Choose "Yes, Proceed" to continue, or Cancel to go back and change the dates.
ZenHR validates the transaction before saving. The end date must be on or after the start date, and the transaction can't overlap another one for the same employee - an overlap is flagged directly on the date field so you can see which date caused it.
Editing a Transaction
Choose Edit in the record's Actions column.
You can change the dates, the amount, the notes and the attachments. The employee and the time off type stay as they are. On some records the dates are locked as well - the fields simply appear disabled.
Edit is only offered on records whose status still allows a change. When no action is available on a row, its Actions button is disabled and explains why: "No actions are available for this record due to its current status", or "You don't have permission to manage these records".
Updating the Resumption Date
Choose Update Resumption Date on a record that needs one.
The panel shows the transaction's Start Date and End Date, and the Recommended Resumption Date ZenHR calculated. Set the Actual Resumption Date and click "Update".
In-Advance Salary
On transactions eligible for it, choose In-Advance Salary to open the in-advance salary batch for that record. This appears only when in-advance salary is set up for your branch and the record qualifies.
Deleting Transactions
To delete one record, choose Delete in its Actions column and confirm.
To delete several at once:
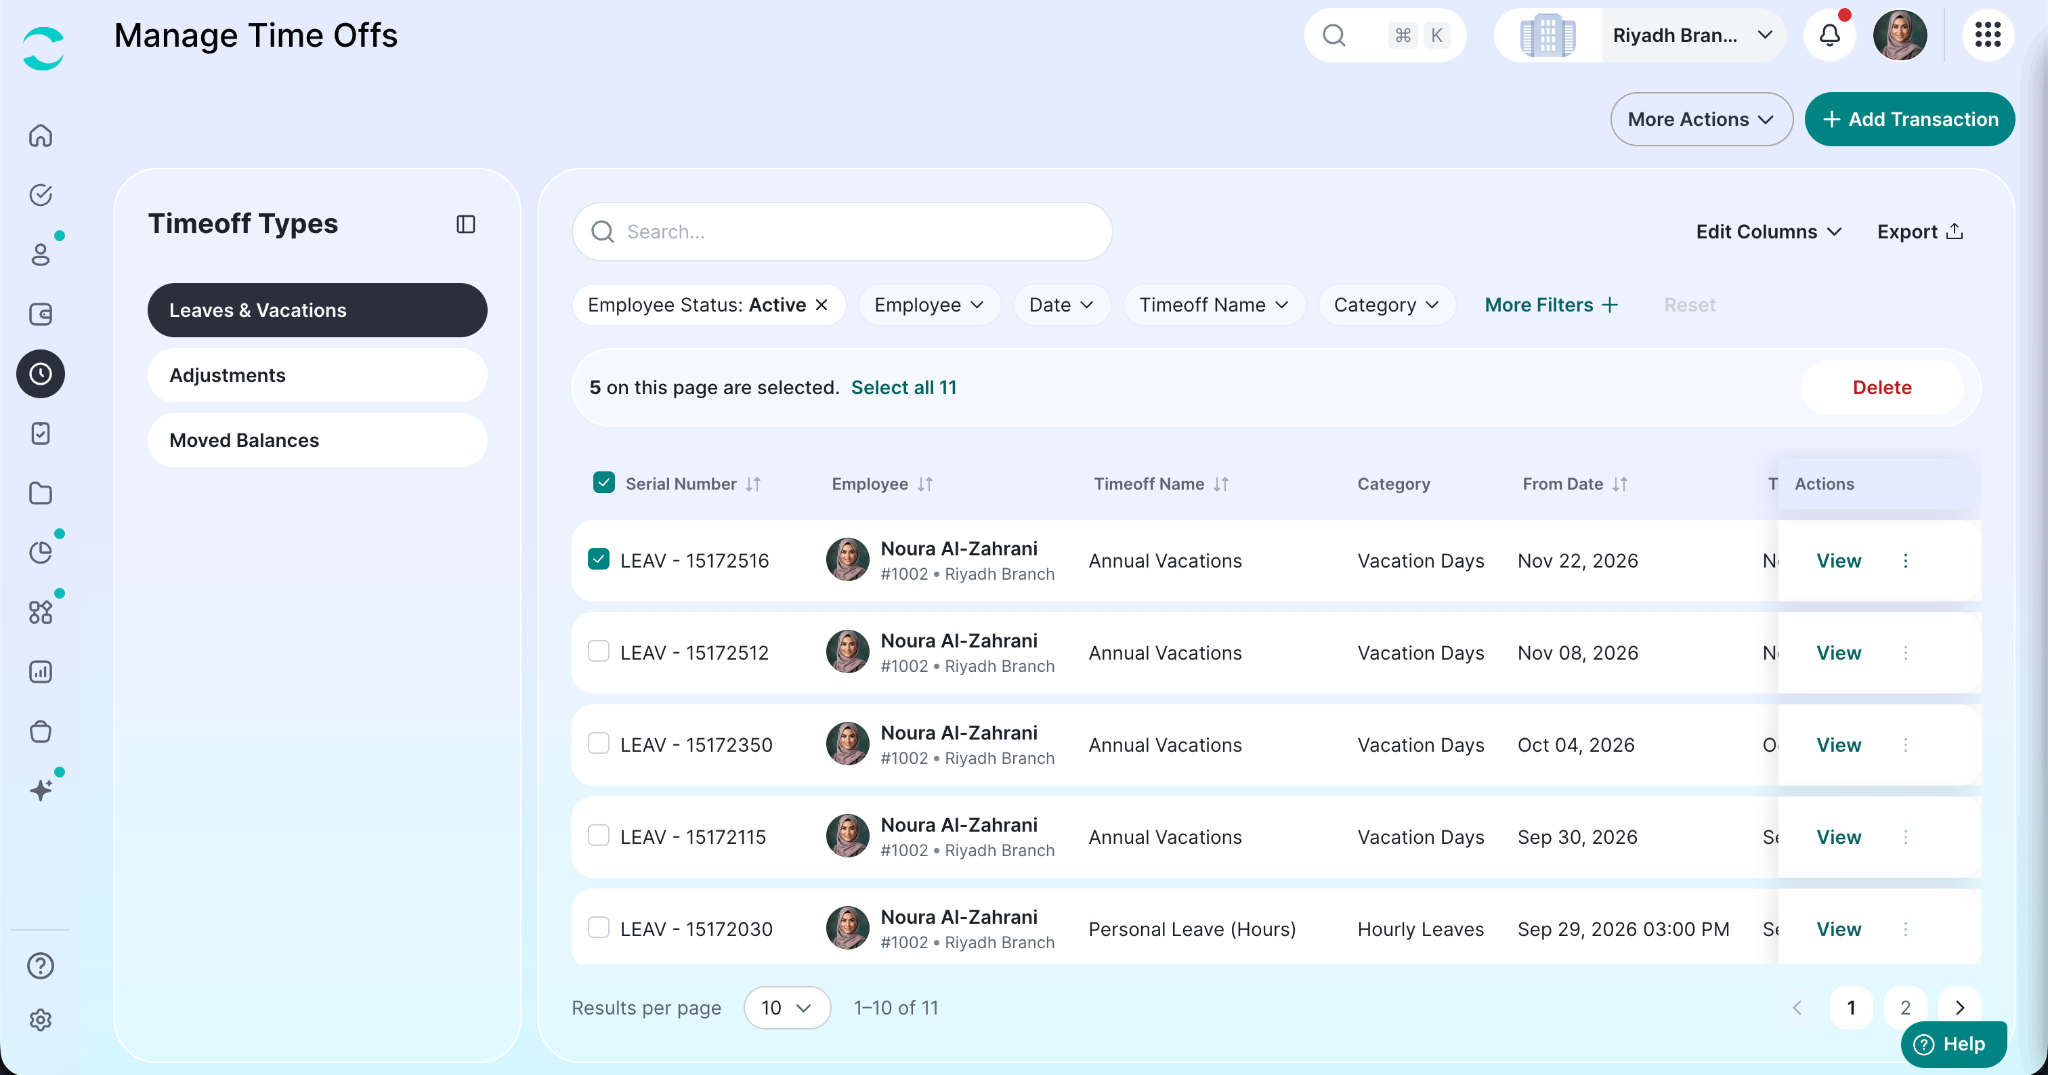
Tick the records you want using the checkboxes. Only records that can be deleted are selectable.
A bar appears showing how many are selected. To go wider, click Select all - that covers every record matching your current search and filters, not just the page on screen.
Click Delete on the bar.
Confirm on the Confirm Mass Delete dialog.
Use Clear selection on the bar to start over. Changing a filter also clears the selection, because it changes what "all records" means.
Note: deleted transactions cannot be restored.
More Actions → Import Transactions
Add many transactions at once from a spreadsheet.
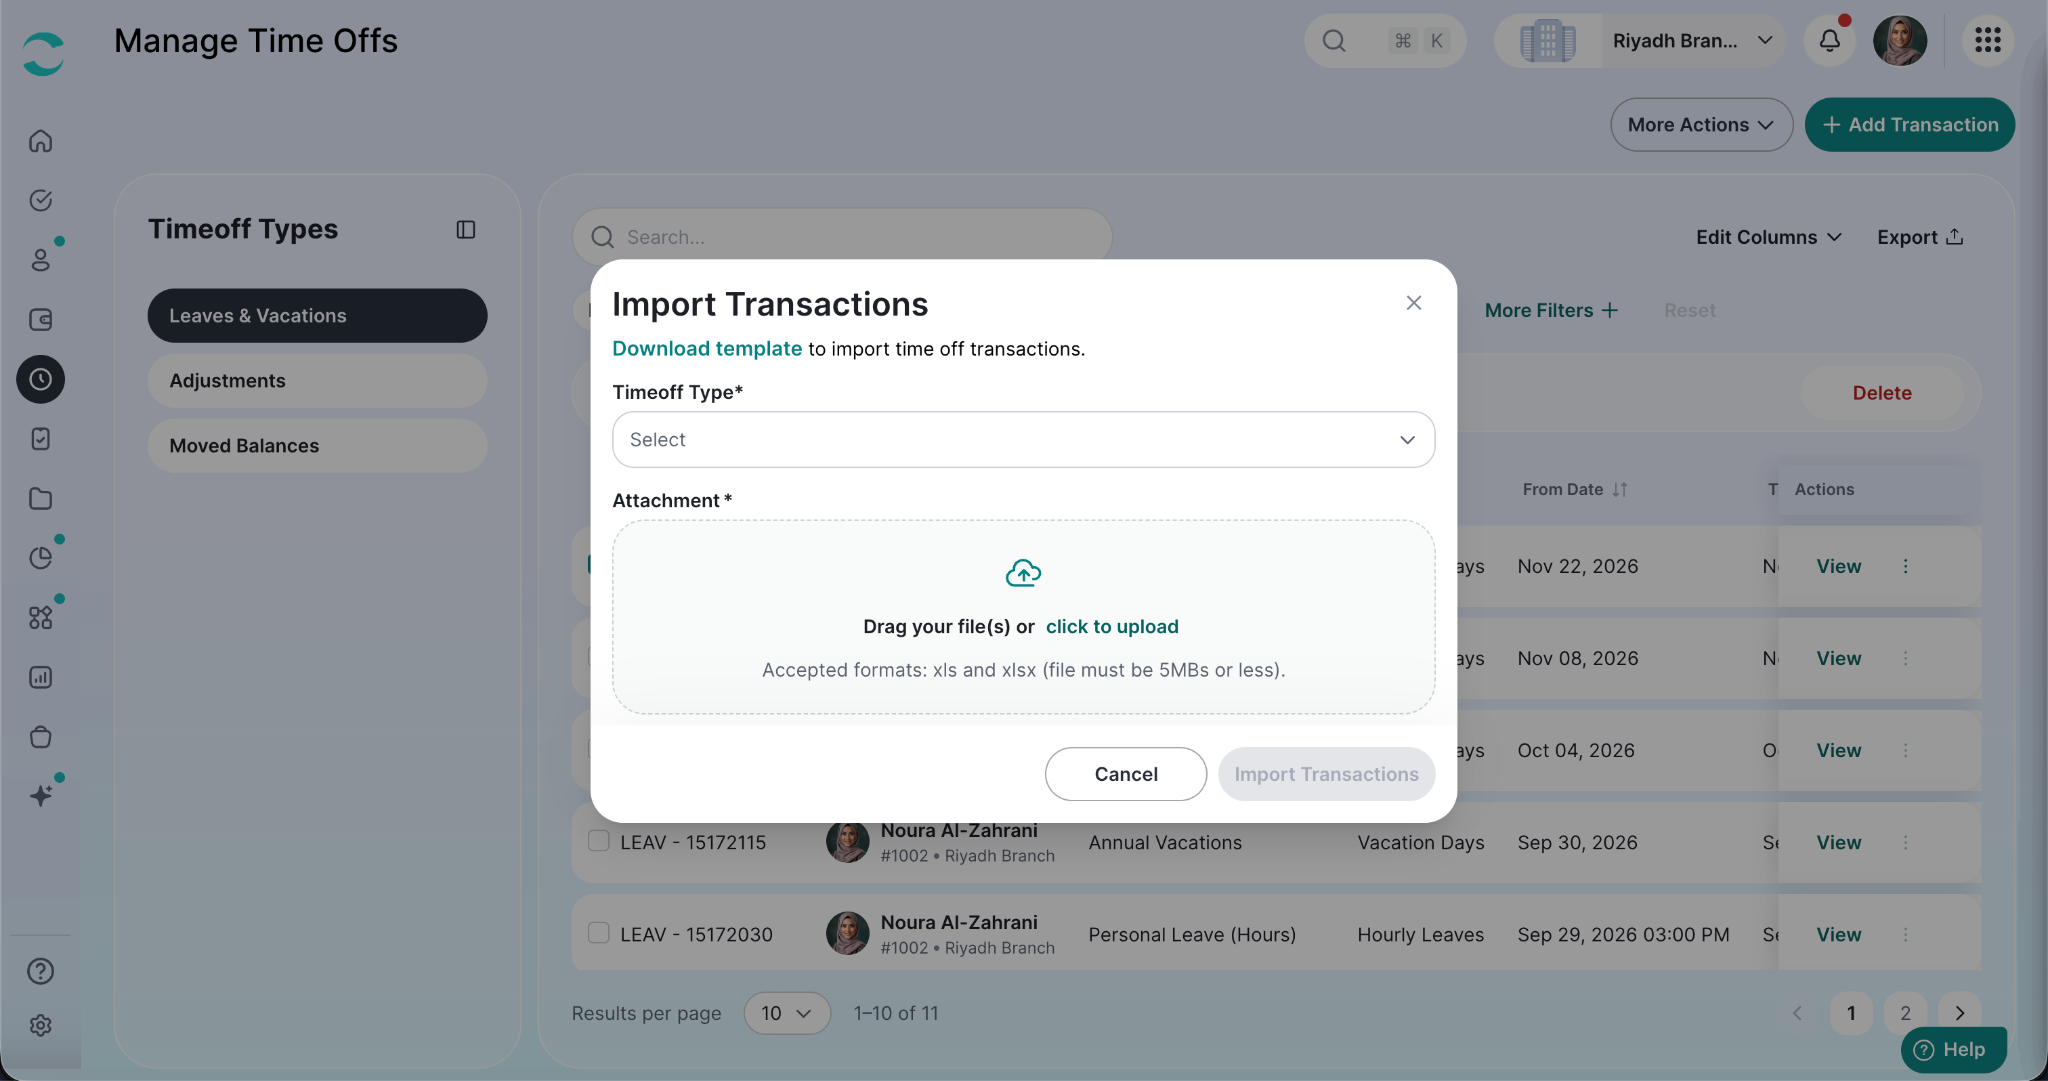
Go to More Actions → Import Transactions.
Click Download template in the description and fill it in.
Choose the Timeoff Type the sheet is for.
Attach the file. Accepted formats are .xls and .xlsx, up to 5 MB.
Click "Import Transactions".
The import runs in the background. When it finishes, ZenHR shows Import time-off transactions status:
Records Imported Successfully - how many rows went through
Failed Records - how many did not, with a table of the Row Number, Employment Number and Reason for each
The table behind the dialog refreshes with the imported records.
More Actions → Generate Disciplinary Actions
Create disciplinary actions for time off behavior across a group of employees.
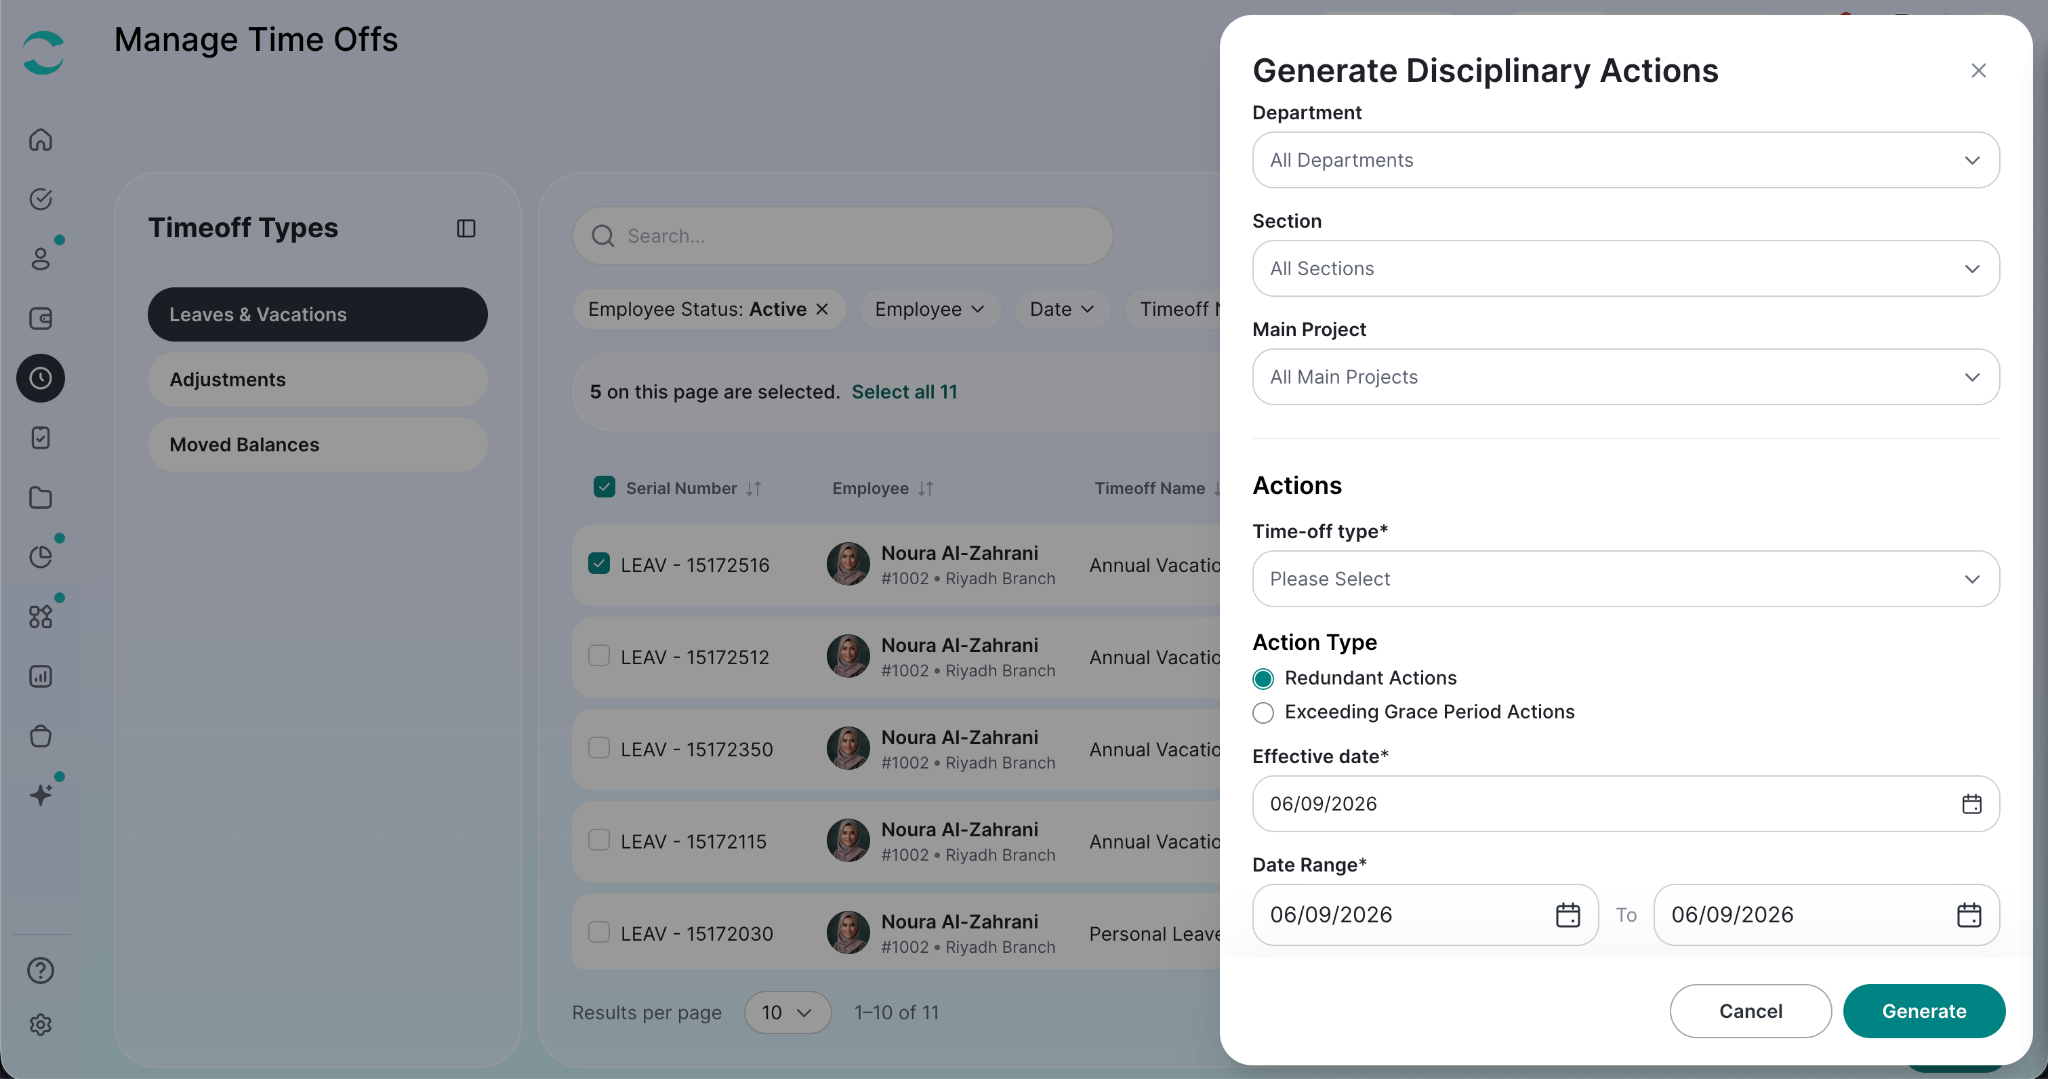
Go to More Actions → Generate Disciplinary Actions.
Under Criteria, narrow down who is included. Any field you leave empty includes everyone:
Employee name
Work Location
Department
Section
Main Project
Under Actions, set what to generate:
Time-off type
Action Type - Redundant Actions or Exceeding Grace Period Actions
Effective date
Date Range - the From and To dates to examine
Click "Generate".
The generation runs in the background and you are notified when it finishes.
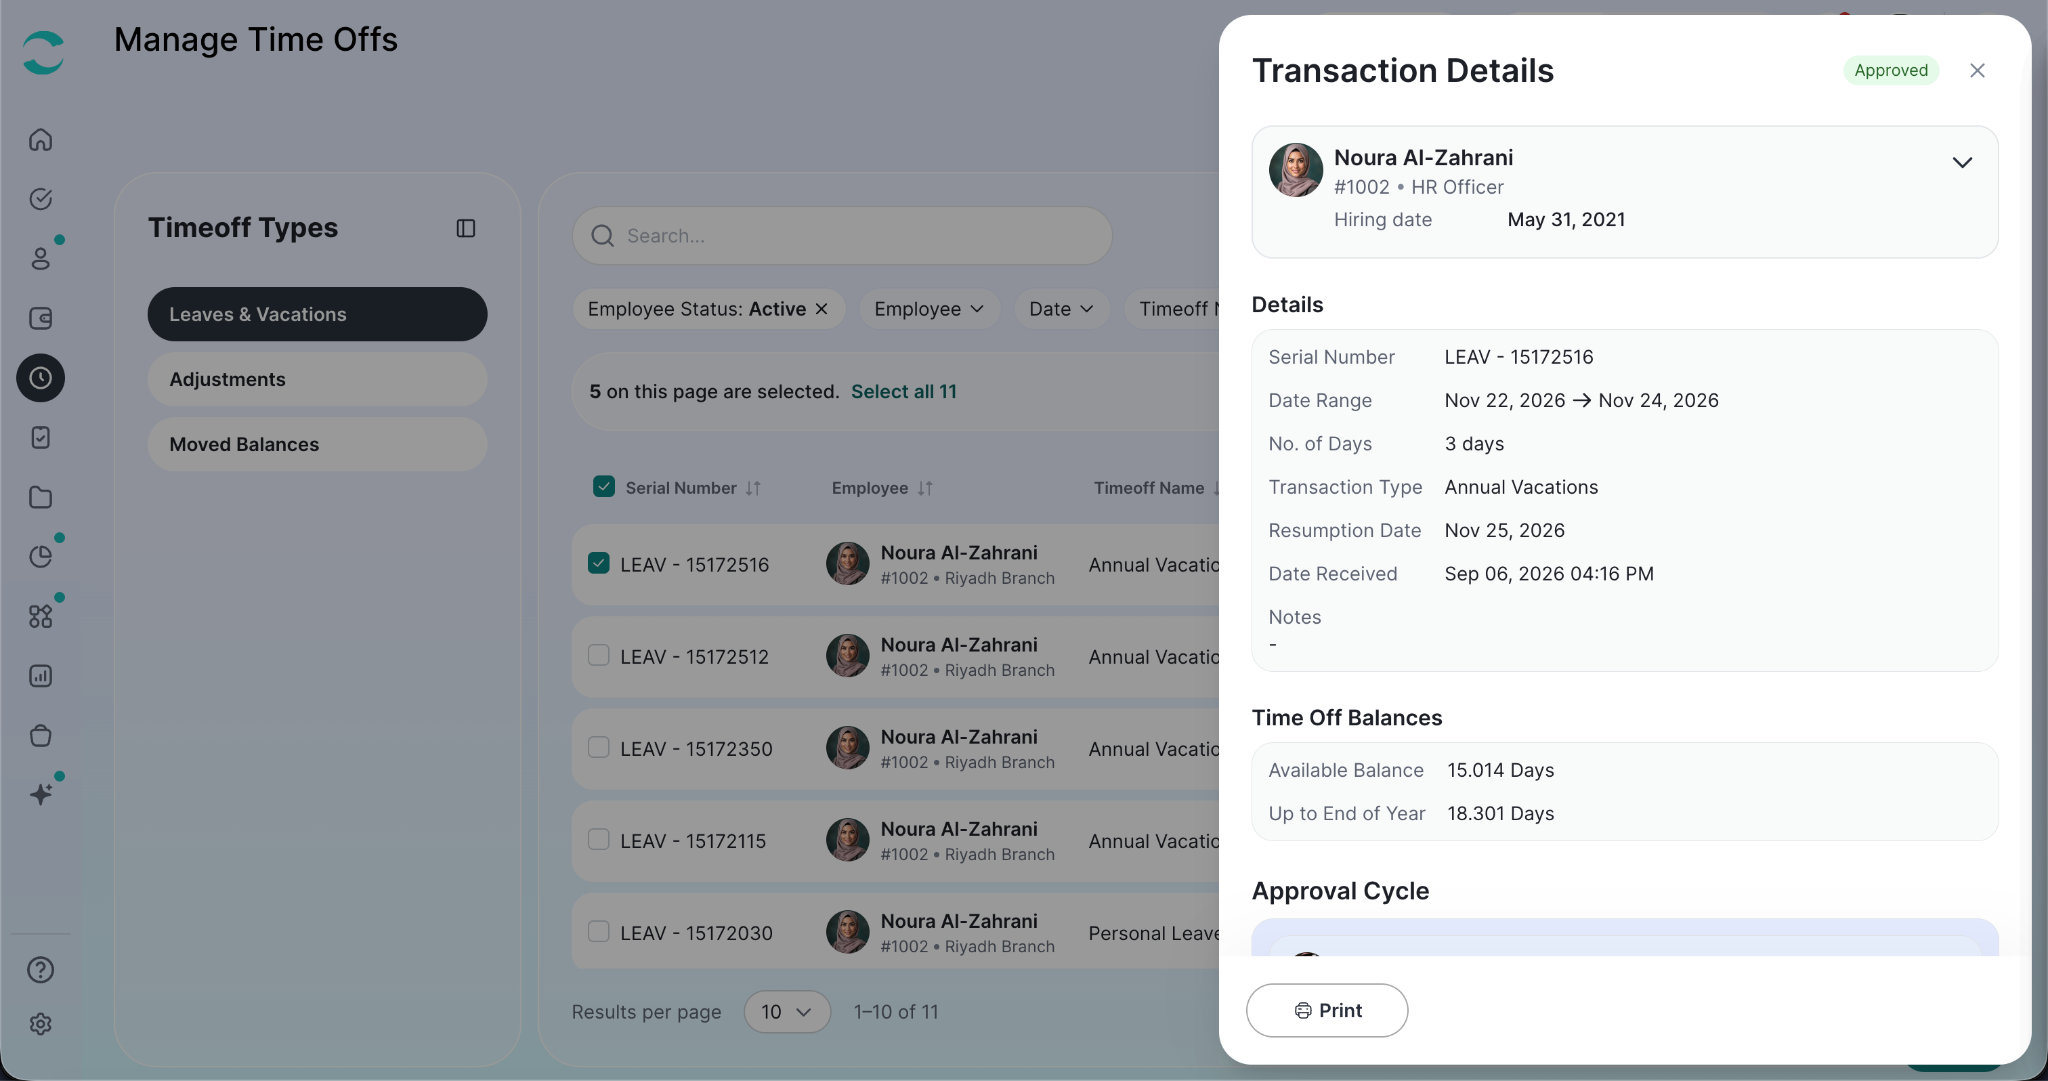
The Transaction Details Panel
Click a row, or choose View, to open it. The record's status appears next to the title.
Employee - name, employment number, job title and photo, plus mobile number, hiring date, direct manager, branch name, work location, department, section, business unit, division, segment, hierarchy group and main project.
Details - Serial Number, Date Range, No. of Days (or No. of Hours for a leave), Transaction Type, Salary Deduction where the type has one, Resumption Date, Effective Date, Date Received, Cut-off Date where one applies, plus Notes and Attachments.
Time Off Balances - the employee's Available Balance and their balance Up to End of Year.
Breakdown - for unpaid vacations, the days split by Month, with the No. of Days and Calculation Base for each, and a Total row.
Approval Cycle - every step of the approval, showing who acted, when the request was received on, when the action was taken on, whether it was taken on behalf of someone, and any notes. Records that went through a cancellation show a Cancellation Cycle too.
Use Print at the bottom to save the whole panel as a PDF.
Tab 2 - Adjustments
Adjustments are manual changes to an employee's vacation balance - adding days they earned outside the normal accrual, or removing days that shouldn't be there.
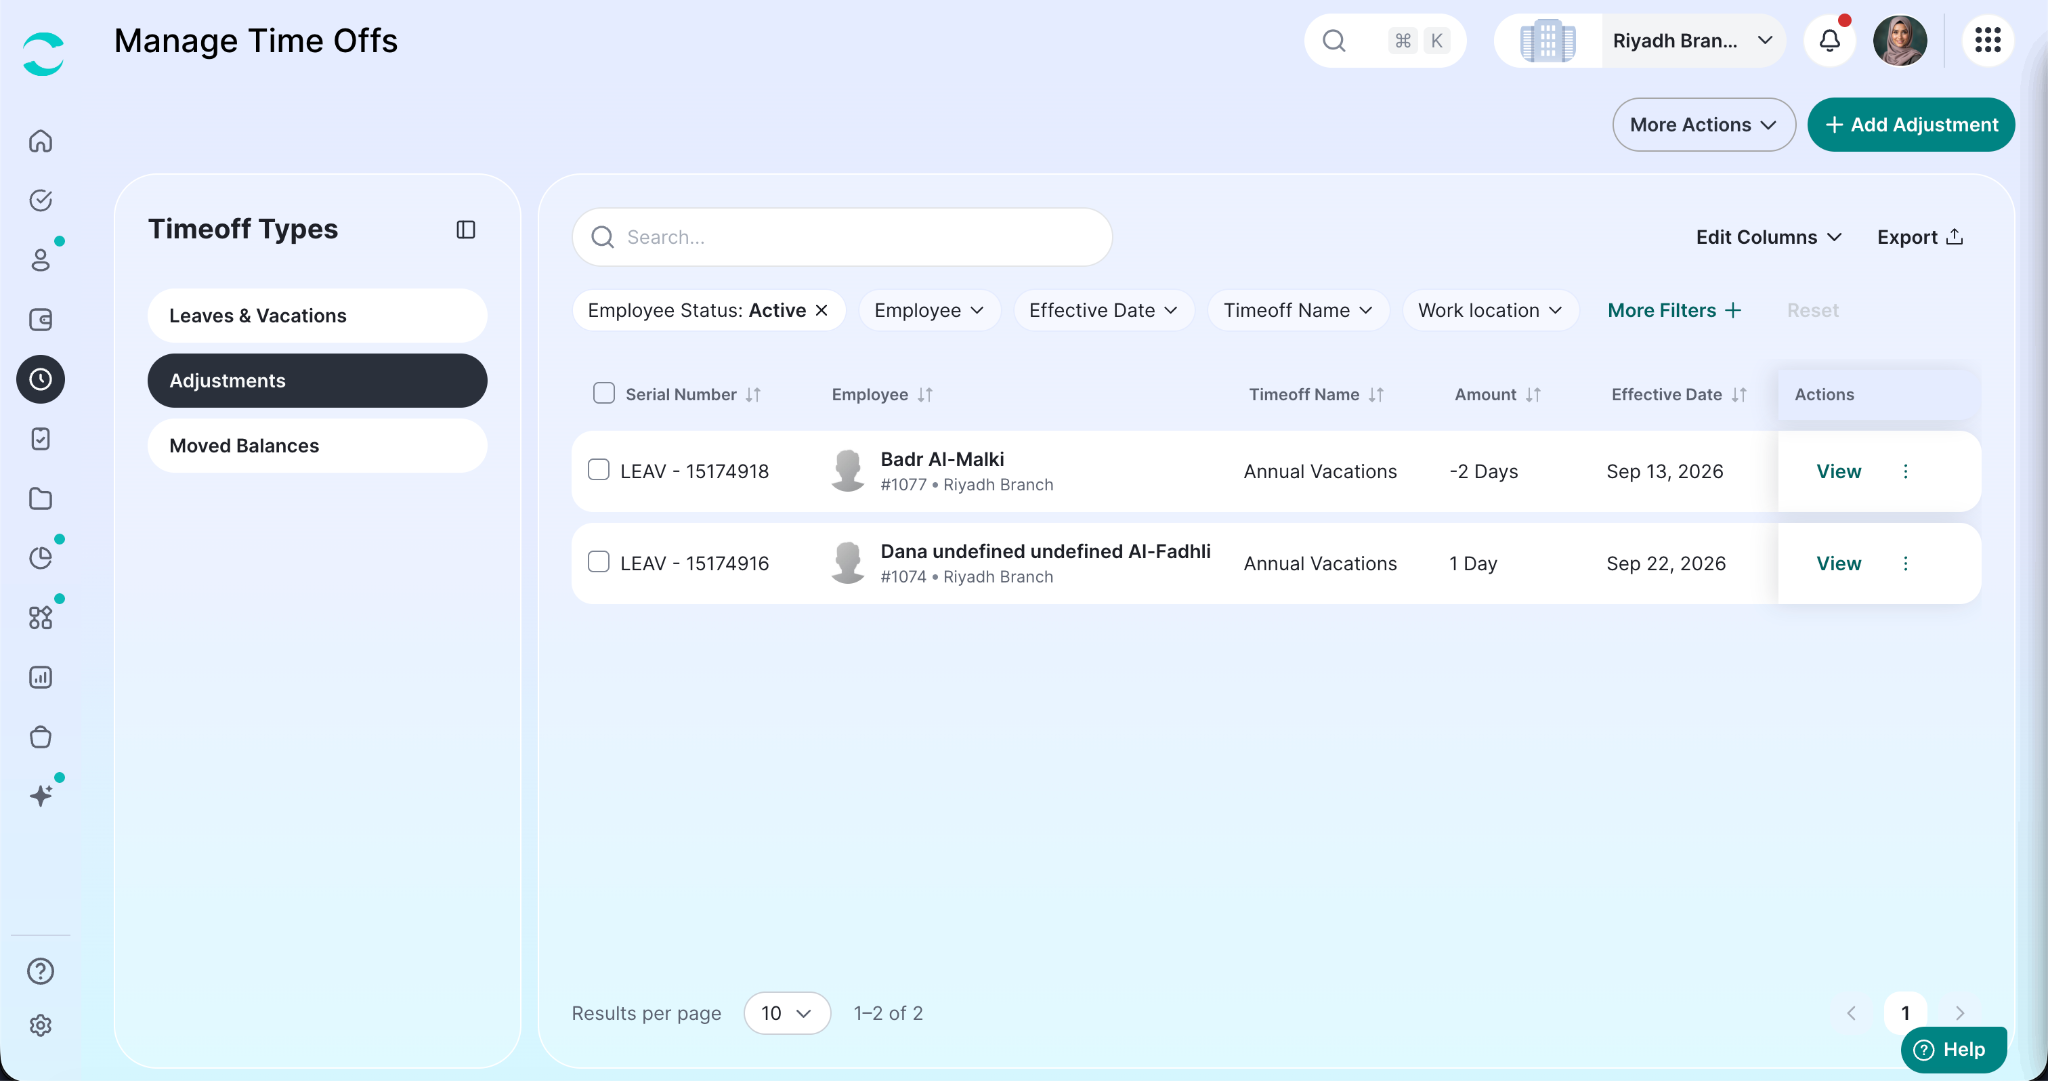
What the Table Shows
Filters
Effective Date - a date range
Timeoff Name
Work location, Department, Section, Main project, Hierarchy group
Employee Status - Active or Inactive (starts on Active)
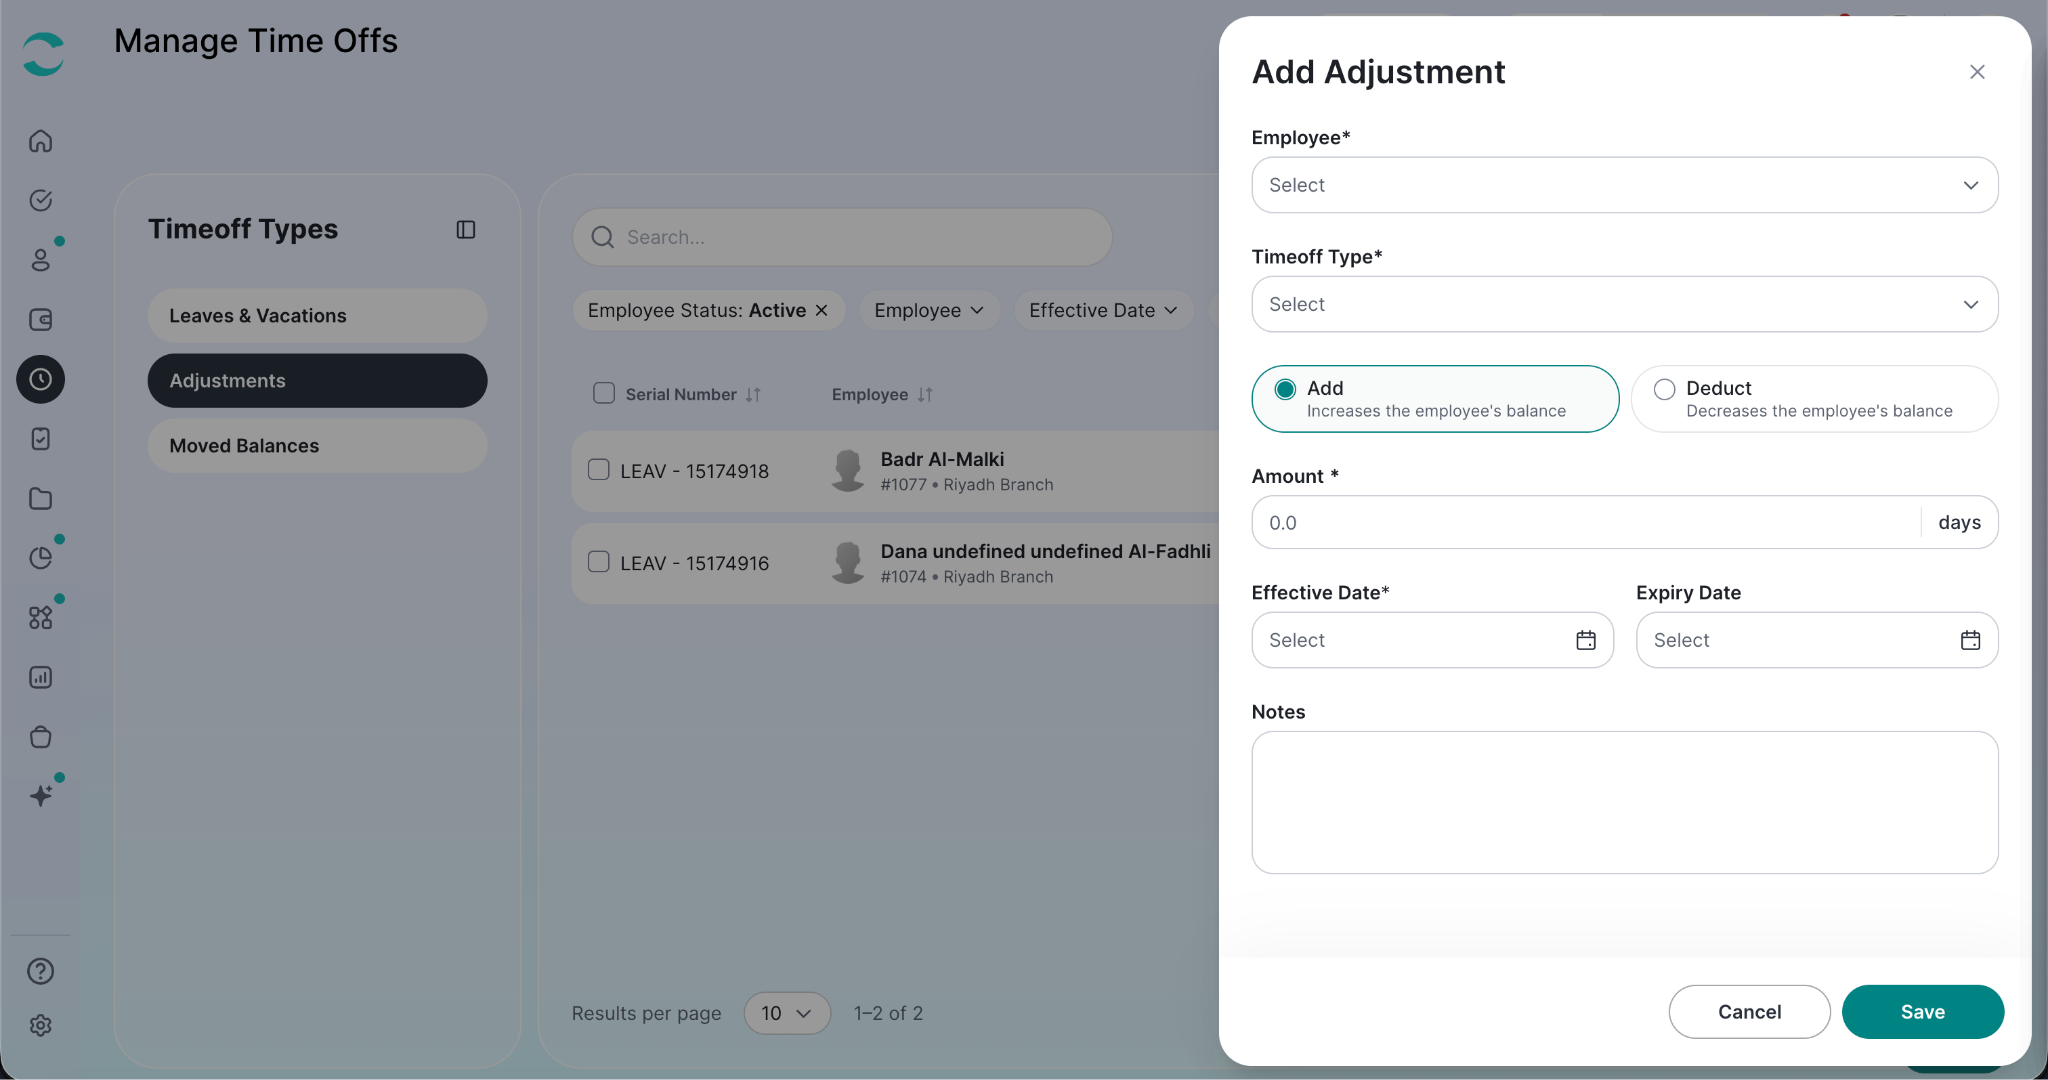
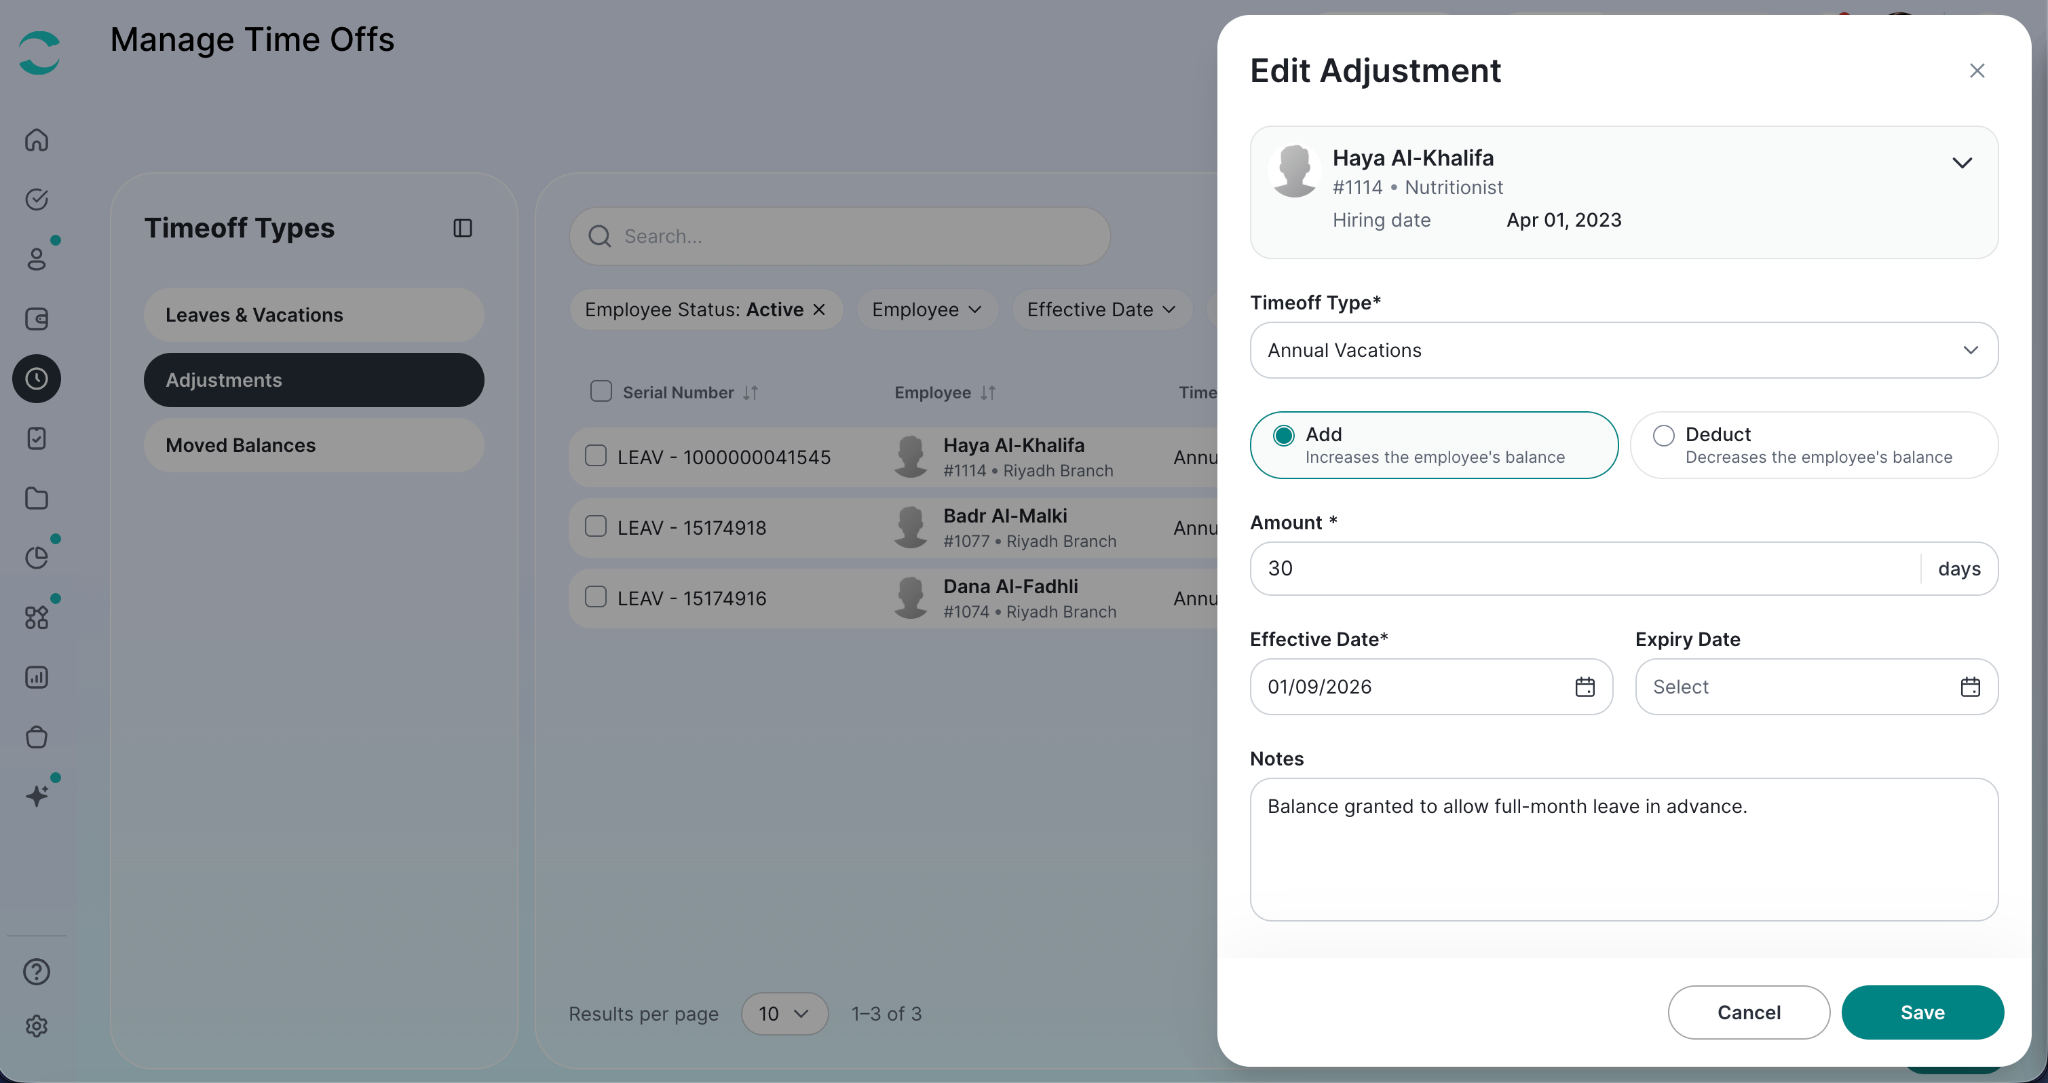
Adding an Adjustment
Click "+ Add Adjustment".
Choose the Employee.
Choose the Timeoff Type. Only vacation types that hold a balance are listed.
Choose the direction:
Add - increases the employee's balance
Deduct - decreases the employee's balance
Enter the Amount in days.
Count Toward Deduction Bracket - turn this on to treat the adjustment as a day the employee actually took, so it counts against your deduction setup. This toggle only appears on a Deduct adjustment for a sick time off type.
Set the Effective Date.
Set the Expiry Date if the added days should stop being available after a certain date. It is not offered on deduct adjustments, and it is locked while Count Toward Deduction Bracket is on.
Add Notes if needed.
Click "Save".
Editing and Deleting
Choose Edit on a record to change its type, amount, direction, dates or notes - the employee stays as it is. Choose Delete and confirm to remove it.
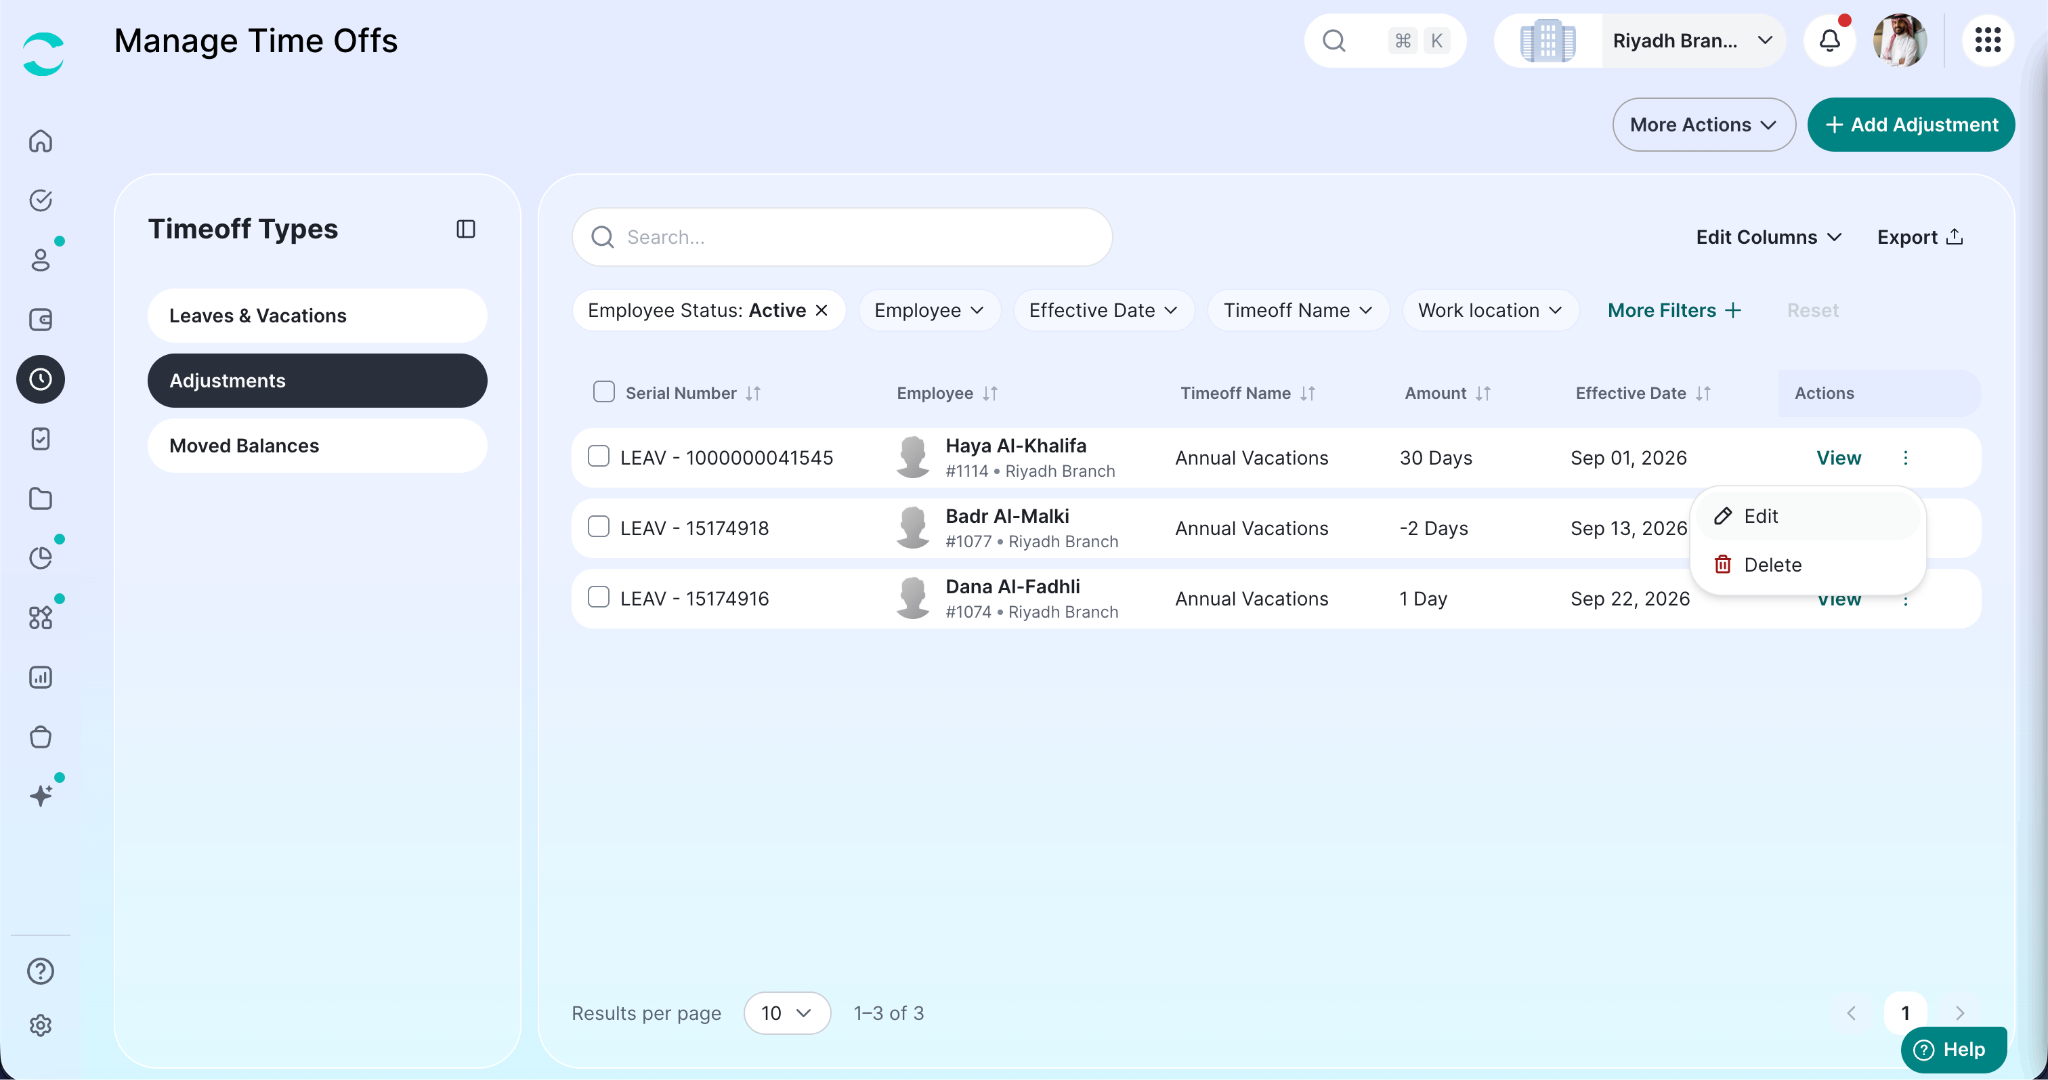
You can also delete several adjustments at once, the same way as on the Leaves & Vacations tab: tick the rows, optionally Select all matching records, then Delete and confirm.
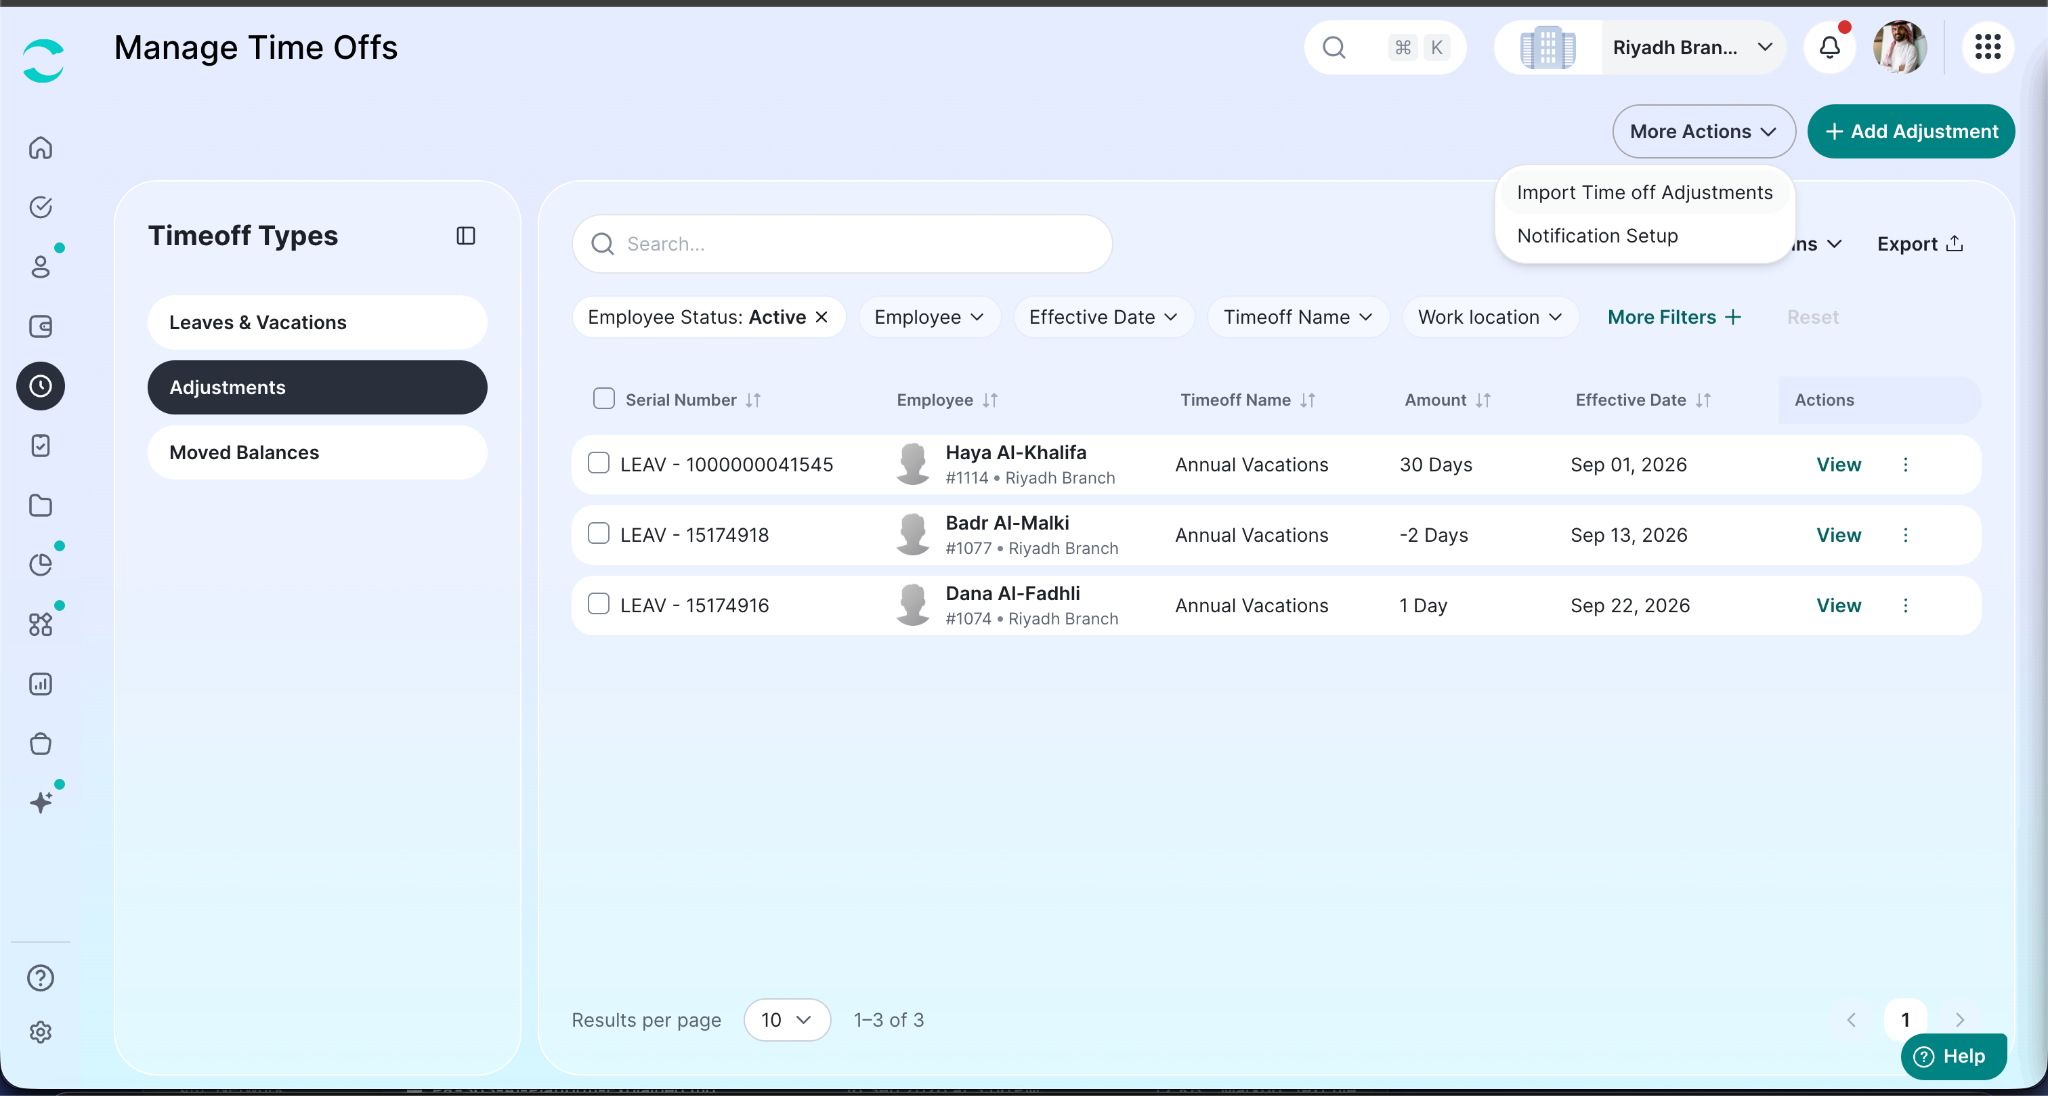
More Actions → Import Time off Adjustments
Go to More Actions → Import Time off Adjustments.
Click Download Template and fill it in. Unlike the transactions importer, there is no type to choose - the sheet carries everything.
Attach the file. Accepted formats are .xls and .xlsx, up to 5 MB.
Click "Import Adjustments".
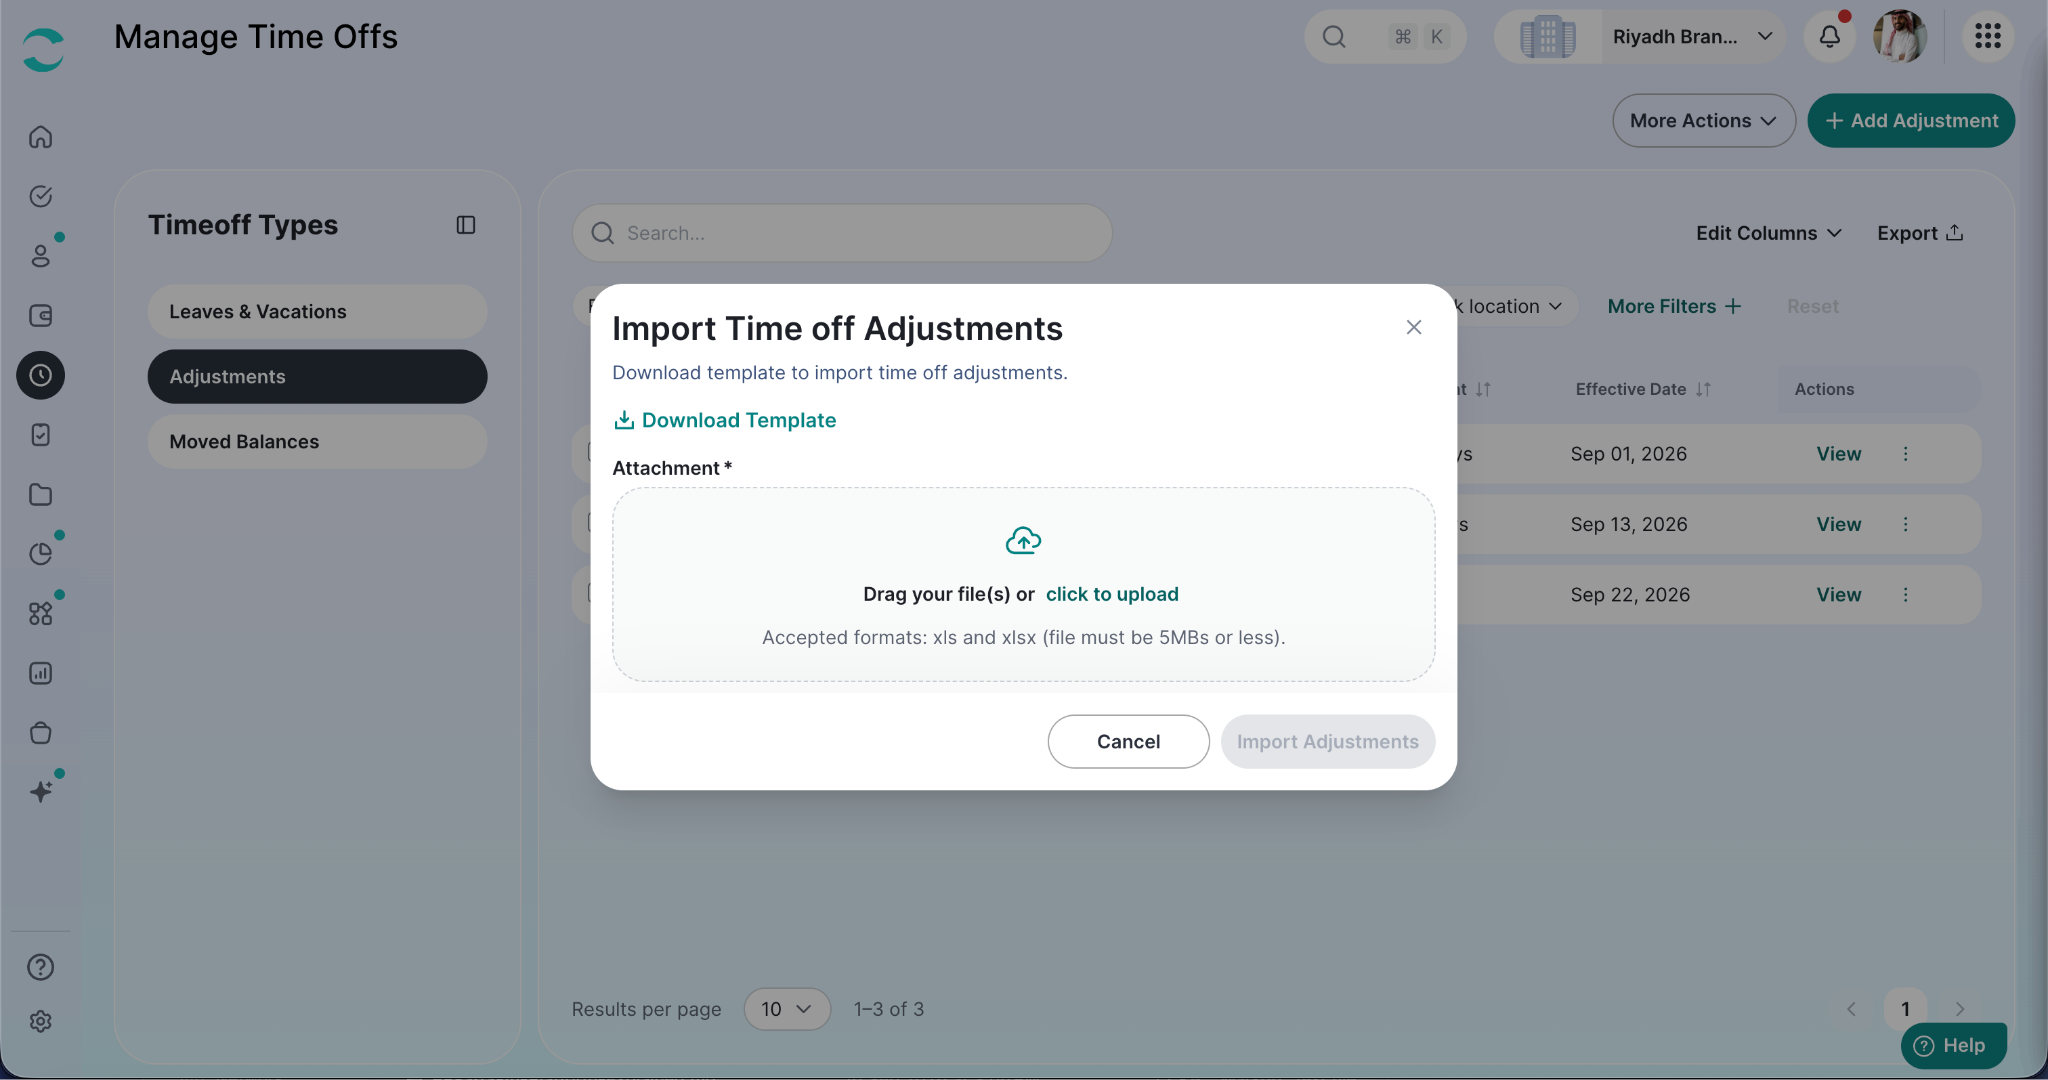
The import runs in the background and the table refreshes when it is done.
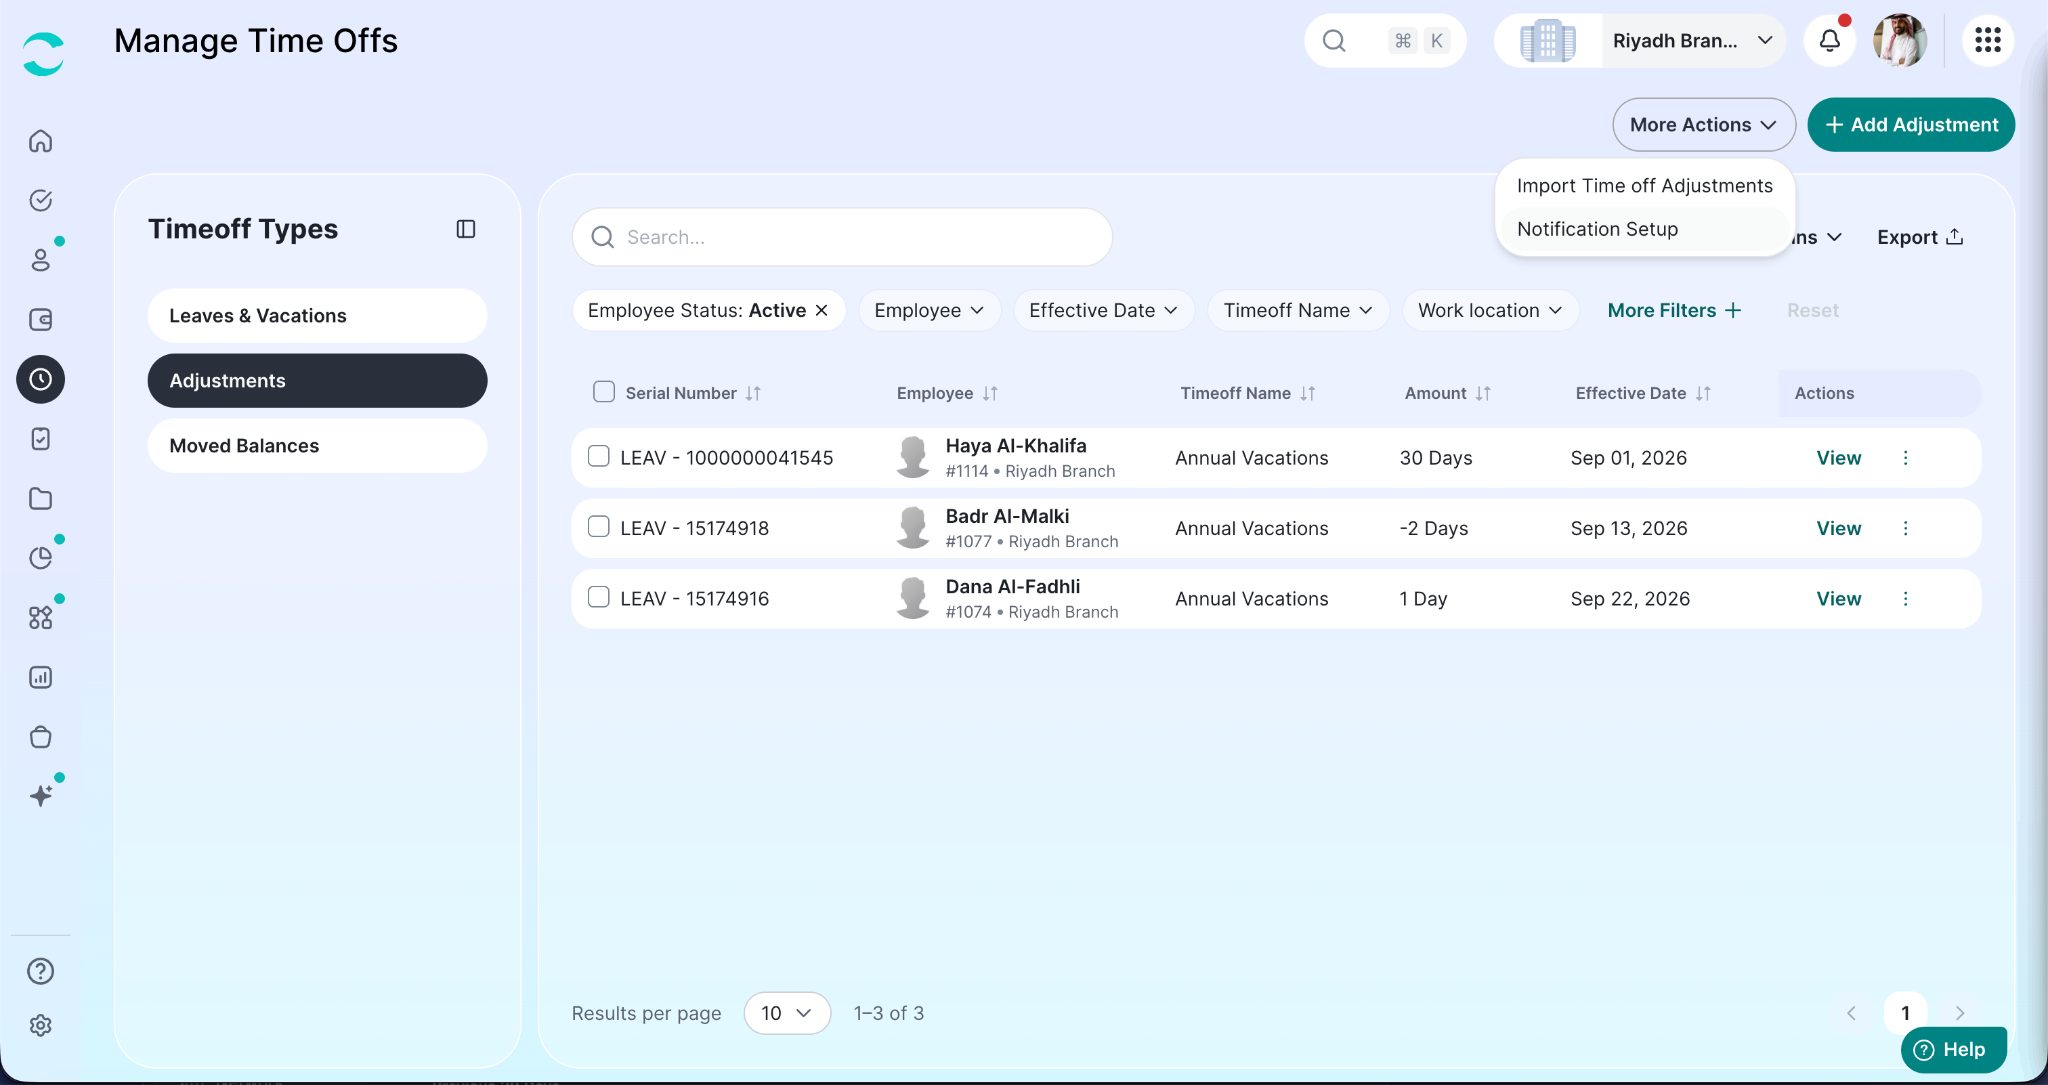
More Actions → Notification Setup
Opens your notification setup so you can control who is notified about adjustments.
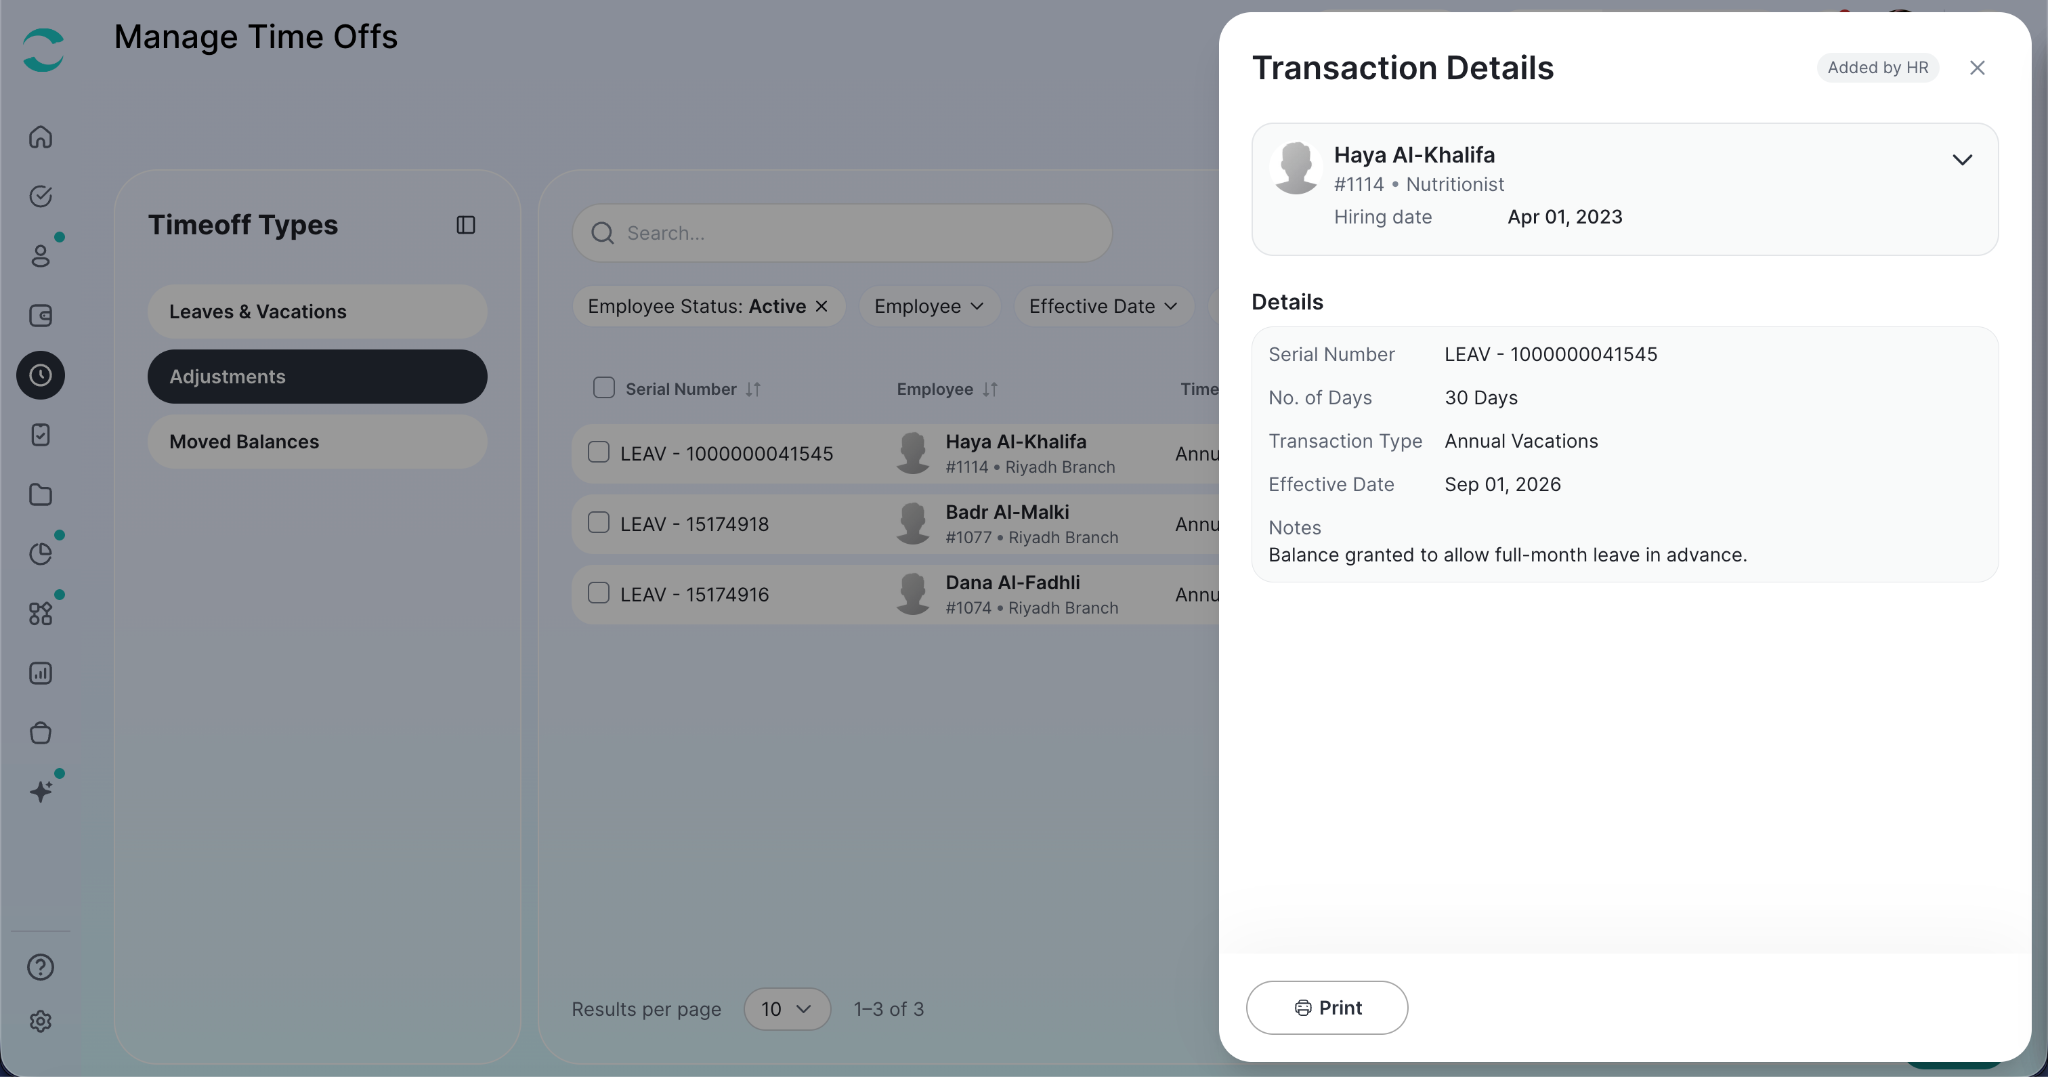
The Adjustment Details Panel
Click a row, or choose View. It shows the same employee card as on the other tabs, and a Details card built for a balance record: Serial Number, No. of Days with its unit, Transaction Type, Effective Date and Expiry Date, plus Notes and Attachments. Use Print to save it as a PDF.
Tab 3 - Moved Balances
Moved Balances lists the balances that were carried over into the current year from a previous one. These records are generated by ZenHR when balances move, so the tab has no add or import action - you review them, and remove one if it shouldn't be there.
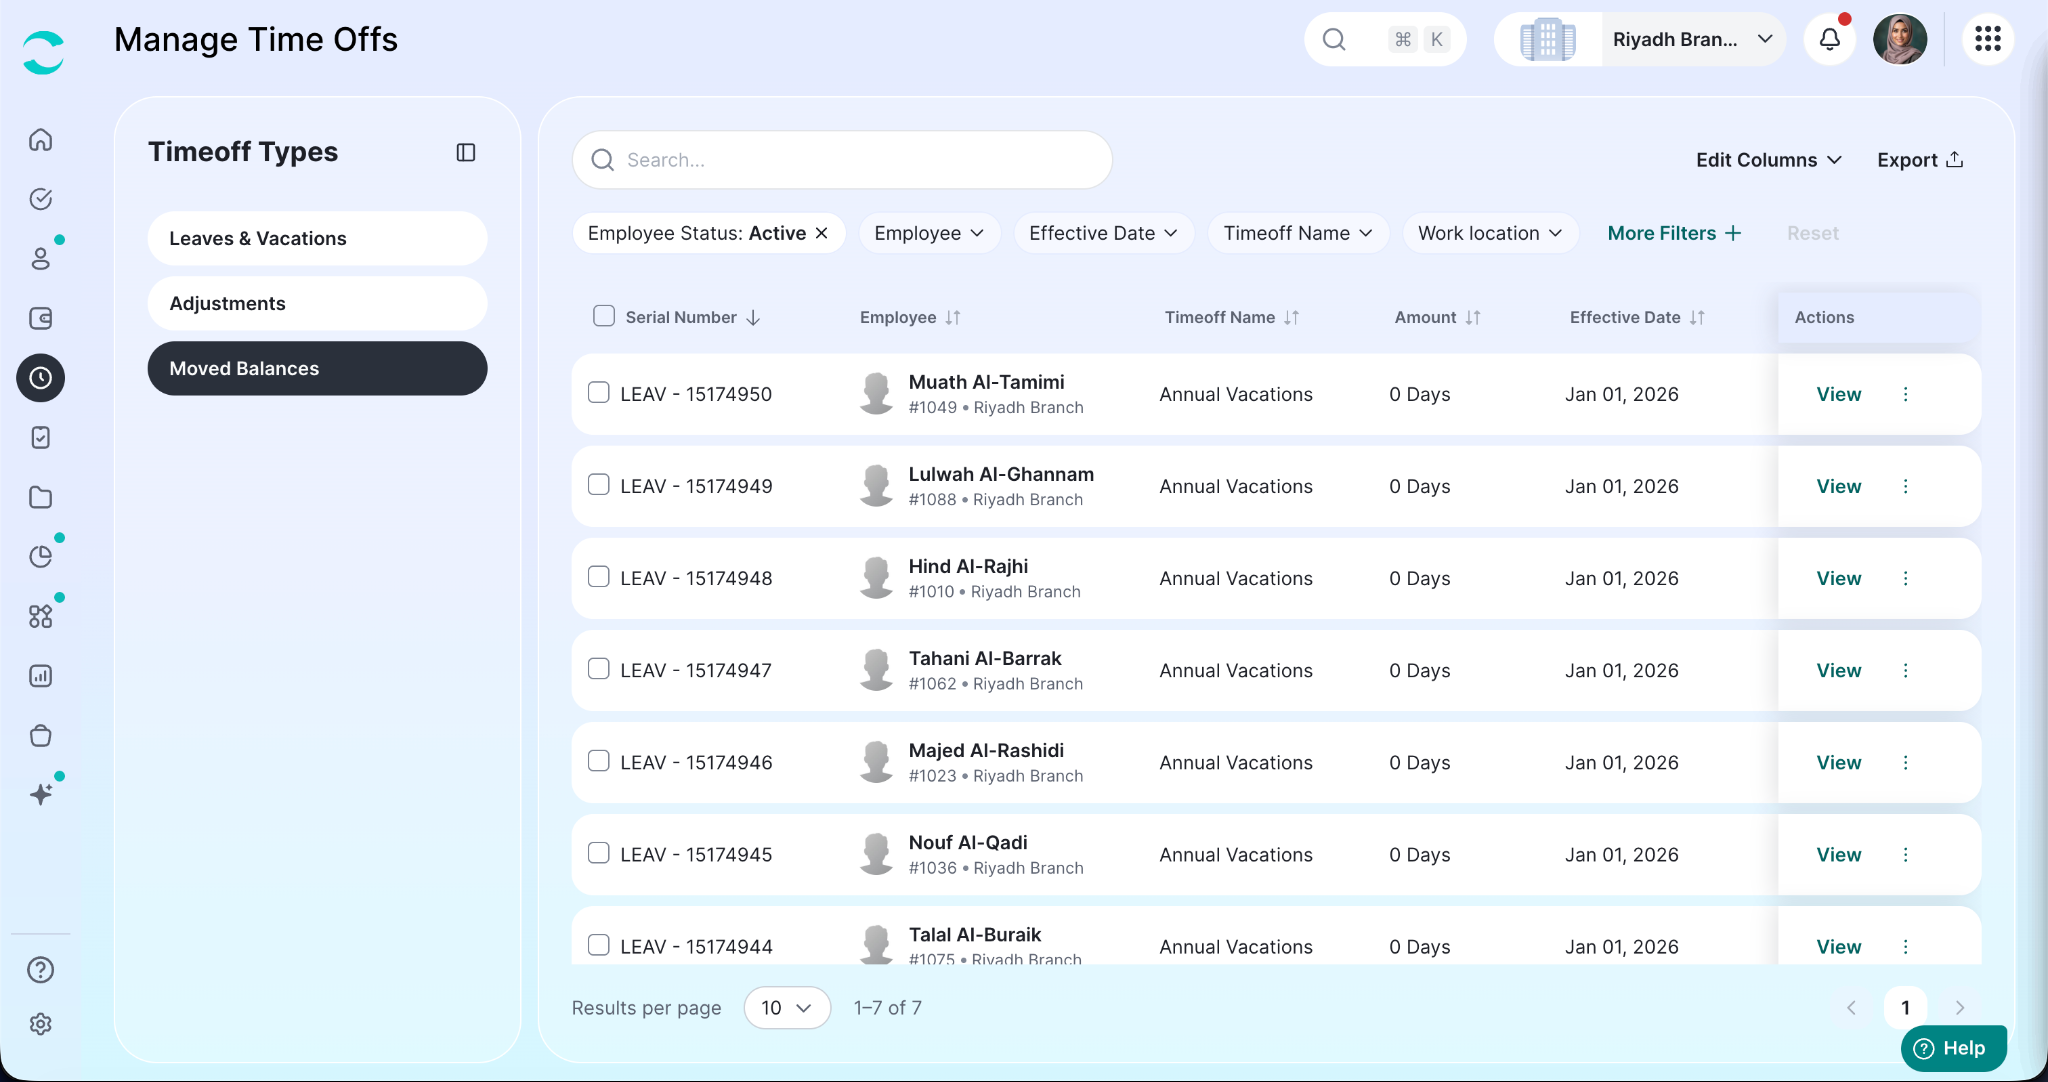
What the Table Shows
Filters
Effective Date - a date range
Timeoff Name
Work location, Department, Section, Main project, Hierarchy group
Employee Status - Active or Inactive (starts on Active)
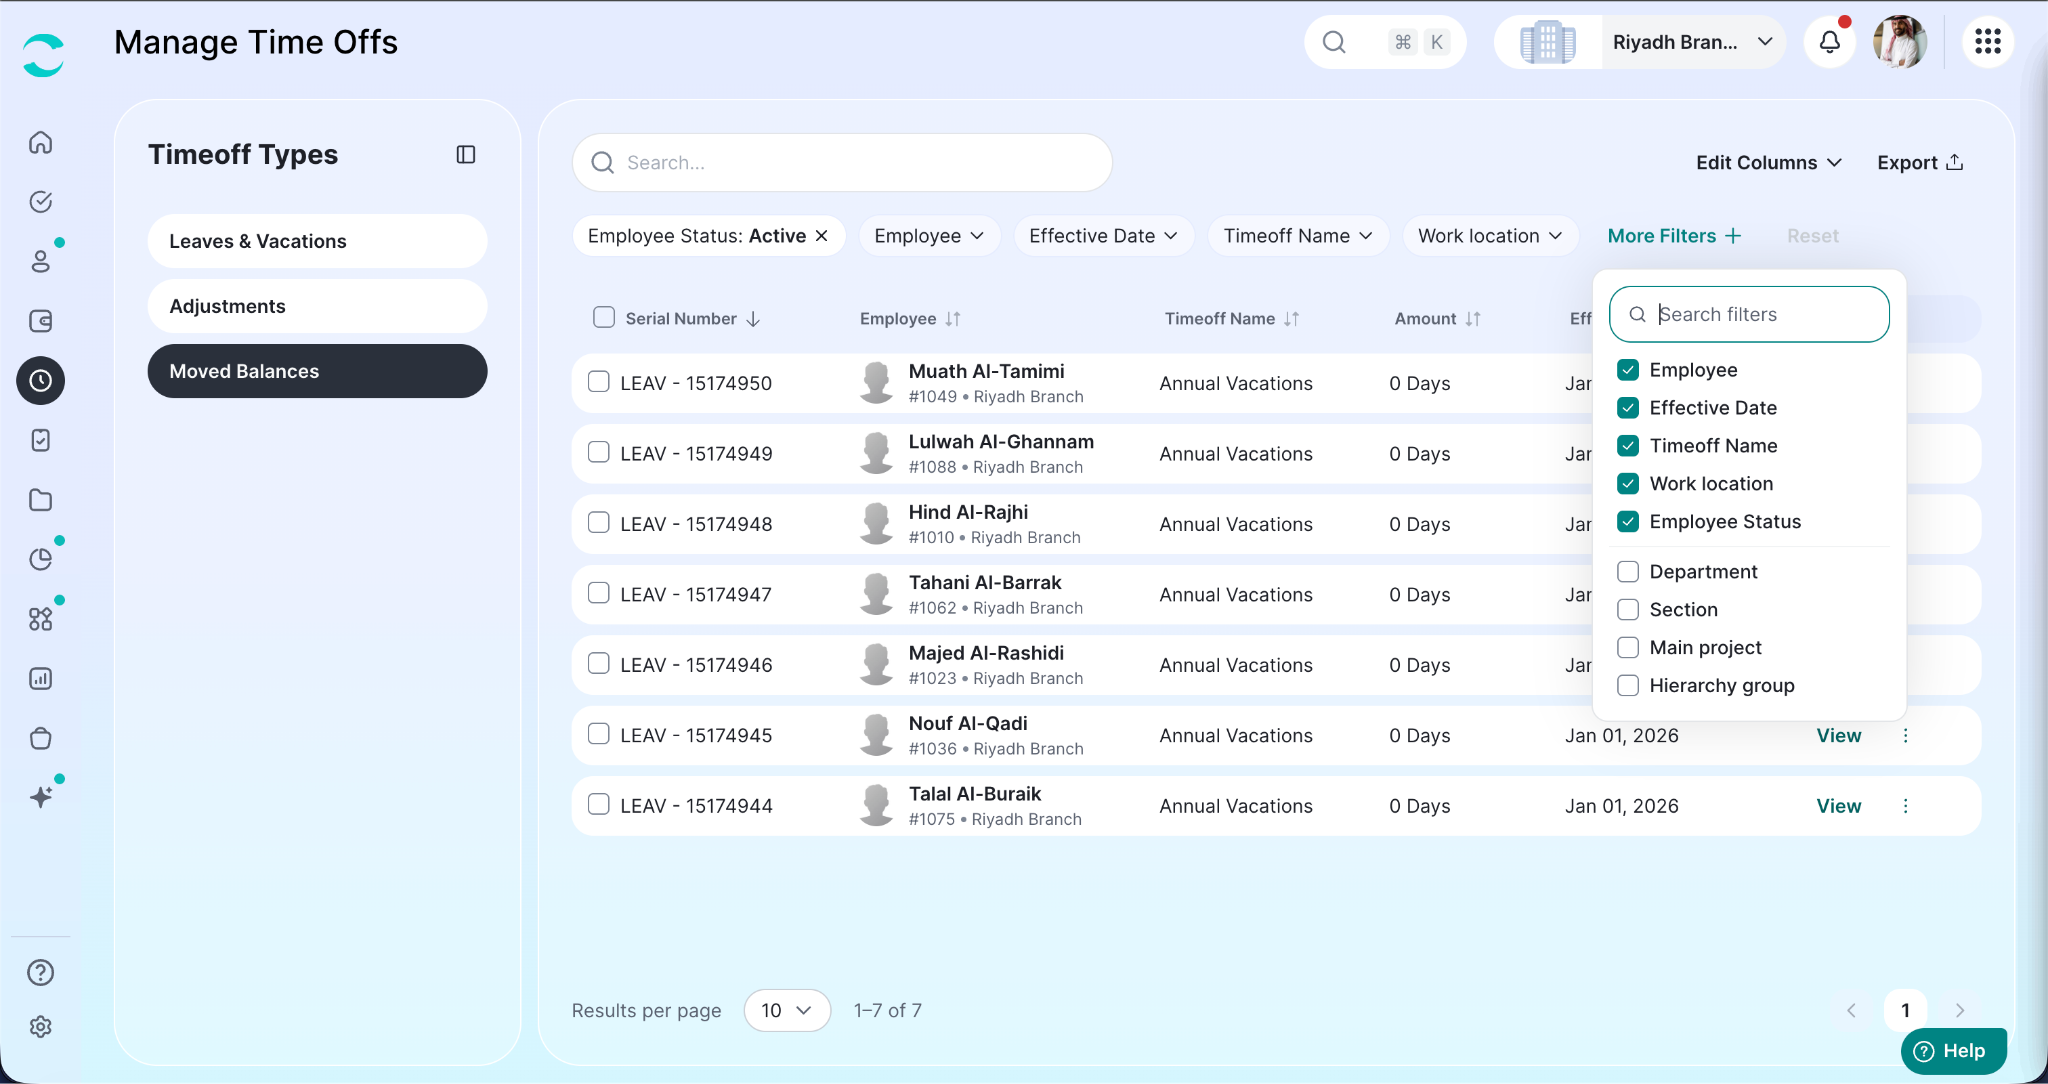
Deleting a Moved Balance
The delete icon sits next to View on the row. Click it and confirm on the "Are you sure you want to delete this moved balance?" dialog.
To remove several, tick the rows, optionally Select all matching records, then Delete and confirm.
The Moved Balance Details Panel
Click a row, or choose View, for the employee card and a Details card with the Serial Number, No. of Days, Transaction Type, Effective Date, Expiry Date, Notes and Attachments. Use Print to save it as a PDF.
Permissions
What you see on this page comes from your user permissions:
With read-only access on a tab you can still search, filter, sort, open records and export - the buttons that change data are simply not shown.
Which employees appear in each table also follows your access level scope, so you only ever see the employees you are allowed to manage.
Important Notes
The three tabs - Leaves & Vacations, Adjustments and Moved Balances - all live on the Manage Time Offs page, and the selected tab is kept in the page address.
Every table starts filtered to Employee Status: Active.
Employment Number is hidden by default on every tab - turn it on from Edit Columns.
Your search, filters and selected tab are kept in the page address, so a view can be bookmarked and shared.
The Amount on a transaction is calculated by ZenHR from the employee, time off type and dates - it is not typed in.
Hourly leaves are shown as hours and minutes; vacations are shown in days.
A transaction can't overlap another one for the same employee, and its end date can't be before its start date.
On an existing transaction the employee and time off type can't be changed. Create a new record instead.
Count Toward Deduction Bracket only appears on a Deduct adjustment for a sick time off type.
Expiry Date is not available on deduct adjustments, and is locked while Count Toward Deduction Bracket is on.
Imports, disciplinary action generation and mass balance moves all run in the background - you are notified when they finish.
Import files must be .xls or .xlsx and 5 MB or less.
Deleted records - transactions, adjustments and moved balances - cannot be restored.
Select all in a mass action covers every record matching your current search and filters, not just the page on screen.
Exports and prints follow your filters, sorting and visible columns. Hidden columns are not exported.
Actions are shown per record. A disabled Actions button means either the record's status doesn't allow a change, or you don't have permission to manage it.
Employees can view their own time off records and balances from their ZenHR profile and the mobile app.
Was this article helpful?
That’s Great!
Thank you for your feedback
Sorry! We couldn't be helpful
Thank you for your feedback
Feedback sent
We appreciate your effort and will try to fix the article